Tag: McDowell Sonoran Preserve (page 10 of 11)

“Cactus Wall” on the Quartz Trail

Marilyn, Bob, and I hiked the Lost Dog Trail and the Quartz Trail several weeks ago.  Bob found this rock wall, below, out of which grew a variety of cacti.

We also saw this saguaro with the many twisted arms:

We saw these poppies at various points along the hike:

Friday Hike: Marcus Landslide in the Rain

Janet, Nick, and I hiked the Marcus Landslide Trail earlier today.  It was raining moderately hard when we started – my nylon pants became soggily plastered to my legs within just a few minutes.  But, thankfully, the rain let up to only a drizzle and the nylon dried quickly.  We all had decent rain jackets, so we were fairly comfortable otherwise.  Janet even had rain pants.

A view of Sven Towers I, II, and III.  (Sven Tower I is on the far right.)  This is an unusual view because normally you can see more of the McDowells behind them.  The clouds were so dense and low hanging that they blanketed everything behind.  A stand of chain fruit cholla is in the foreground.

A view of the trail shortly after starting up the “landslide” portion of the Marcus Landslide Trail:

I think this is the Granite Ballroom area:

Nick and Janet hiking up the Marcus Landslide Trail:

Submarine rock is the second large rock – it’s the one that’s broken in two pieces.

A saguaro with more low hanging misty clouds in the background.

Nick and Kevin:

We saw some poppies along the way.

A view through the broken and leaning mushroom rock:

As we neared the trailhead on the way back, we noticed that the sun was almost starting to shine on Troon Mountain off in the distance.

Nick taught me a new word today, gabion.  A gabion is a wire cage used for holding rocks or other materials.  The gabions (and rocks) shown here form retaining walls for erosion control.

McDowells: East End and Thumbnail Pinnacle

On Saturday, January 5, Bob and I did a hike in the McDowell Mountains starting at the Tom’s Thumb Trailhead.  We hiked out Mesquite Canyon, taking a climber’s access trail up past the Sven Towers climbing area.  We proceeded on to another climbing area known as Hog Heaven.  Just above Hog Heaven is a small pinnacle that’s visible from McDowell Mountain Park and even from parts of Fountain Hills.  Our goal for the day was to get to that pinnacle.  There’s a climb rated 5.5 on that pinnacle named “Thumbnail” so, therefore, I’ll call it the Thumbnail Pinnacle in this post.

In the photo below, the Thumbnail Pinnacle is a third of the way over from the right hand side of the photo.  Several walls of the Hog Heaven climbing area are below it.

Another view as we got somewhat closer:

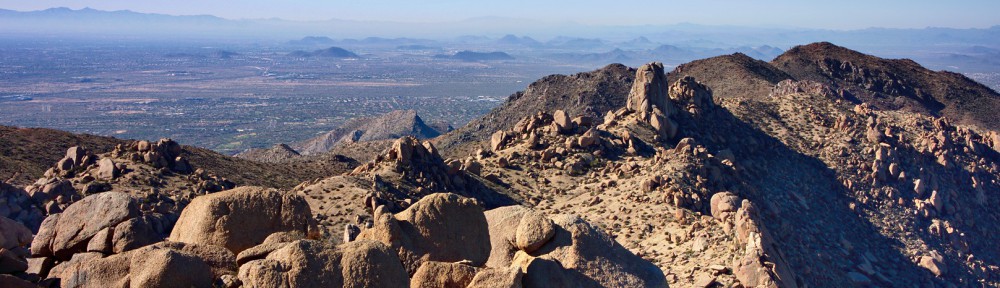
A view to the east and downward from atop a boulder from near the Hog Heaven climbing area.  Portions of the Marcus Landslide Trail can be seen at the bottom of the photo.  About a third of the way over near the bottom is a large rock called “Submarine Rock”.  McDowell Mountain Park is visible above Submarine Rock.  Further off in the distance are the communities of Rio Verde and Tonto Verde followed by some mountain ranges whose names I do not know.

It was interesting to look at the full size, 6024×4024 pixel, versioni of this photo.  Zoomed in all the way, I was able to locate some of the trails that I either hike or mountain bike regularly in the park.

A view to the southeast of Fountain Hills, Weaver’s Needle, and Red Mountain:

Below are several views of the Thumbnail Pinnacle.

Slightly above the Thumbnail Pinnacle is a view Scottsdale to the west:

We looked up and saw what we thought might be the peak.  It turns out that it wasn’t the peak, but the actual peak wasn’t too far away.  I thought the line of whitish stones was interesting.

A closer look at those “white” looking stones.  Close up, they don’t appear to be white at all, but they are lighter in color than some of the surrounding rock and the ground.

We hiked up to the peak above us.  The photo below is a view of the Thumbnail Pinnacle from above.  Four Peaks is visible at the left of the photo.

Thompson Peak (with the antennas) to the left and McDowell Peak to the right:

A view of the East End (Peak) with a small weather station below and to the left.  It didn’t look all that far away and it seemed that there might be an easier way down off in that direction, so we made our way over to that peak.

On our way over to the East End peak, we looked down and saw the East End Trail with its many switchbacks.

A view into Scottsdale from near East End peak:

The weather station:

A view of Tom’s Thumb and Scottsdale from atop East End Peak.  While we were up there, we spotted a lower peak that we decided to bag next.

Bob, atop East End peak:

We saw several USGS markers, below, on a rock adjacent (and slightly lower) than the peak.  It appears to me that 4001 has been etched on the marker, but several other sources state that the elevation is 4,067 feet.  I think it’s likely that more accurate methods of determining elevation were used sometime after 1968 to determine the height.  The rock upon which Bob is standing in the photo above is the highest point in the McDowell range.

Bob took this photo of some Javelina that we saw on the saddle below us as we were descending.

As we descended, both Glass Dome and Tom’s Thumb became visible.

We crossed the saddle where we saw the Javelina and came upon this rock (at the right) which we decided to call Mitten Rock.

A view of another rock formation to the southeast.

Looking down on Gardner’s Wall and Tom’s Thumb:

Bob took this photo of me as we descended further:

A view of Pinnacle Peak and part of Troon.  Part of the Tom’s Thumb Trail is also visible in this photo.

Glass Dome and Tom’s Thumb:

Once we intersected the Tom’s Thumb Trail, we hiked over to the intersection with the East End Trail and took another climber’s access trail down past Gardner’s Wall.  On the way, we saw this roadrunner, below.  Bob took this photo – he had more zoom on the lens of his camera.  It’s a much better shot of the roadrunner than any that I took.

A short ways further, we saw this rock, which sort of reminds me of a dinosaur head:

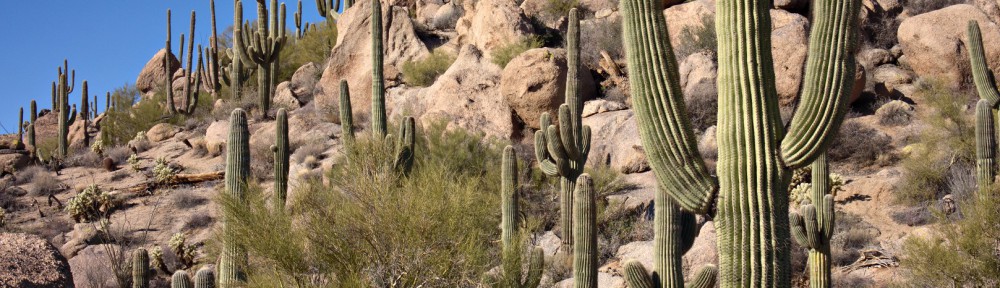
I liked this view of the saguaro standing next to a large boulder only slightly taller than the saguaro:

Friday Hike at Little Granite Mountain

Four of us, Marilyn, Linda, Bob, and I skipped the scheduled Fitness Hike at McDowell Mountain Park this week.  Instead, we met at Linda’s house and hiked up to the top of Little Granite Mountain!

The goal was get to the peak of this mountain:

A view from early in the hike when we were on good trails:

There are a lot of trails in this area, nearly all of which were made by motorcycles and quads.  This area is now part of the Preserve; Linda tells me that there is almost no motorcycle traffic there now.  We did, however, see some recent tracks on one of the trails that we hiked.

It’s difficult to know which trails to hike; we basically just guessed until we got to a point where I thought we might be able to begin our ascent.  We bushwhacked for only a short ways before finding an established trail.  We found numerous trails on our way up.  Unfortunately, there’s a lot of growth and rocks.  We’d often lose the trail for a time only to find it, or some other trail, again later on.

Here is a photo Linda making her way up one of these marginal trails:

The route we ascended was in the shade and was quite cold even though we were expending a lot of energy.  Bob forged ahead and waited for the rest of us in the sun.  That’s still not the top though, just one of the lower peaks.

A view of Troon to the left and Pinnacle Peak to the right.  We were surprised at the high density of saguaros in the area.

More saguaros!

Another view of Pinnacle Peak from even higher up.  This photo helps to convey just how steep this area is.

Linda took this photo of me on top of the peak:

Linda also took these photos of me and Marilyn:

We were definitely not the first ones up there.  The US Coast and Geodetic Survey placed this marker on the top in 1946.

A view from the top.  Bartlett Dam is just visible at the far right of the photo.

Four Peaks with a small bank of clouds for a cap:

Another view from somewhere near the top.  We wandered around for a long while trying to decide on the best way down.  I had seen some cairns that looked promising, but somehow we missed them during the initial part of our descent.  I backtracked and found them only to find that they lead back to where the rest of the group was patiently waiting.

We ended up taking a different route on our descent.  We somehow made our way down through that mass of rock and vegetation in the photo below.

Linda, Bob, and Marilyn hiking back on easier trails:

Looking up at a large saguaro.  I thought about editing the airplane out of the picture, but decided to leave it in.

Linda took this photograph of the same saguaro.  I’m in the process of framing the shot above.  The NEX-7’s viewscreen does tilt, but not quite enough for me to see what’s at the top of the frame.  It took several tries before I was satisfied with the composition.

We ended up hiking 6.2 miles with over 1500 feet of total ascent.

Tom’s Thumb from the Northwest

I hiked up to Tom’s Thumb on Wednesday.  I started at the Tom’s Thumb Trailhead and hiked a short ways on the Tom’s Thumb Trail until I reached the climber’s access trail to Fort McDowell, Lost Wall, and Half-and-Half Wall.  This trail starts out fairly flat; the first part is pretty easy.  But then it gets steeper and steeper still as you go up.  After passing Fort McDowell, the trail is loose and crumbly with unsure footing.  I would have had difficulty making it to the top without my hiking stick.  But I enjoy this kind of thing and found it fun.

When I got to the ridge line, the hiking became easier again and I set up my tripod to take a few pictures – they were all hand-held shots up to that point.  At this point I was to the Northwest of Tom’s Thumb and I was able to get some rarely seen shots of this rock formation.  The trail got more difficult as I got nearer to Tom’s Thumb.  I had to do a lot of scrambling to get to the other side so that I could rejoin the other (shorter and easier) access trail to Tom’s Thumb.  Even non-climbers take this (shorter and easier) trail to see Tom’s Thumb.

This is a view of Tom’s Thumb, Gardener’s Wall, and Glass Dome from the climber’s access trail.  I think the other prominent rock formation in the immediate foreground is the Half-and-Half Wall.

I think this is the East End.  A small portion of Morrell’s Wall is visible at the far left.  Four Peaks is on the horizon off to the left too.

A view of Troon Mountain and Pinnacle Peak (and lots of houses).

Another view of Tom’s Thumb from the northwest.  The rock formation in front of and to the right of Tom’s Thumb is called The Rist.  The top of Gardener’s Wall is visible at the far left.  Glass Dome is the smaller rock formation about a third of the way over from the left edge of the picture.  Weaver’s Needle in the Superstition Mountains is barely visible in the distance.

Looking to the southwest into Scottsdale:

Another view of Tom’s Thumb from a spot near the top of Gardener’s Wall.  (Another climber’s access trail leads from the Tom’s Thumb Access Trail over to the top of Gardener’s Wall.)

Another view of Glass Dome.  Weaver’s Needle is still barely visible in the distance.

Looking back towards Troon:

I saw this rock while descending the Tom’s Thumb Trail:

Another view while descending the Tom’s Thumb Trail:

The back sides of Sven Towers I and II with Rio Verde and Tonto Verde off in the distance:

Near or shortly after sunset:

The sky changed very rapidly.  I got this shot just a few minutes later:

A tree.  It looks better in silhouette than it does in the daylight.


Friday Hike at the Tom’s Thumb Trailhead

Friday’s Hike wasn’t an official Fitness Hike scheduled at McDowell Mountain Park, but five of us met at the Tom’s Thumb Trailhead just off of 128th Street.  Bob, Bob’s dog Sarge, Linda, Nick, and I hiked the Marcus Landslide Trail, including the short loop at the end.  After hiking the loop on the Marcus Landslide Trail, we backtracked to the intersection with the Boulder Trail and took Boulder down to the Pemberton.  From there, we hiked over to Coachwhip and turned off on the Windmill Trail.  We took the East End Trail up to the Tom’s Thumb Trail, which took us most of the way back to the parking lot.  We made a slight diversion near the end in order to make our hike just slightly longer than twelve miles.

A pair of rocks near the Sven Slab climbing area:

A saguaro on the Marcus Landslide Trail:

Another view from the Marcus Landslide Trail:

A broken mushroom rock leaning against another rock.  I managed to avoid getting the sign in the photo by standing right behind the sign while taking this photo.  (I took another photo of this rock formation on a hike back in November.  On that occasion, I had Nancy stand in front of the sign.)

Another mushroom shaped rock:

Bob’s dog, Sarge:

Submarine Rock:

Beneath Submarine Rock:

Bob, Sarge, Linda, and Nick on the Coachwhip Trail:

Looking up at a few of the many switchbacks on the East End Trail:

Views from the East End Trail:

Linda, Nick, and Bob near the top of the East End Trail:

Linda takes a break while Nick explores the nearby cave / shelter:

The cave / shelter:

Below are some signs on the Tom’s Thumb Trail.  Joe and I climbed at Fort McDowell one time, but I haven’t been any further on this trail.  Back in the ’90s, Marilyn and I tried to find the other climbing areas, but there weren’t decent trails to these areas back then. (None that I could find, anyway.) According to the map, this trail should lead all the way to Tom’s Thumb.  I think it’d be fun to try to get to Tom’s Thumb via the Fort McDowell / Lost Wall / Half and Half Wall access trail.


Friday Fitness Hike

Bob, Janet, Linda, Nancy, and I met at 7:30am, half an hour early, in order to give ourselves enough time to do a long hike with a significant amount of elevation change.  A 7:00am start might have been even better.

We hiked out Dixie Mine to the mine, passed the petroglyphs, and continued up the wash until we hit the Prospector Trail.  We took Prospector up to the Bell Pass Trail and then hiked up to Bell Pass.  After looking at the views afforded by our vantage point at Bell Pass, we turned around and hiked the Bell Pass Trail to the Windmill Trail.  We stopped at the windmill and spent some time looking around that area.  We continued on Windmill until it ended at Coachwhip. Coachwhip took us back to the Dixie Mine Trail, which, in turn, took us back to our vehicles.  We hiked twelve miles with over 1700 feet of total ascent.

Bob pointed out this bright field of quartz on the Dixie Mine Trail:

Linda takes photos of the petroglyphs near the mine, while Janet looks on:

Petroglyphs:

Linda hikes up the smooth and slippery rock of the (dry) waterfall while Nancy and Bob negotiate the bottom section.  It’s not really as far down as it looks in this photo; it’s an illusion created by the wide angle lens I was using.  If you look to the far left, you can see another petroglyph.

This is what it looked like from the bottom:

Linda, Janet, Bob, and Nancy slightly past the waterfall area.

Saguaros on the Prospector Trail.   The saguaros are “leaning” due to the fact that I was pointing the wide angle lens slightly upward.  I had thought about trying to correct the lean in post processing, but Marie convinced me that the photo looked cooler left alone.

The windmill, for which the Windmill Trail was named:

This large cottonwood is near the windmill.  It makes for a better landmark than the windmill itself since the windmill can be kind of hard to see from the Windmill Trail.

Another view of the cottonwood and the bullet-ridden storage tank:

Looking up through the dead tree at the right in the previous photo:

A view from the Coachwhip Trail.

Another view from further down the Coachwhip Trail:

Bob, Janet, and Linda pass the turnoff to the mine on the way back:

Tom’s Thumb Trail

Marilyn and I hiked the Tom’s Thumb Trail on Sunday afternoon.  We parked in the new parking area – this adds a bit of distance to the hike.  I ended up with five miles exactly, though I did have to add a few extra steps in the parking area to arrive at that exact number.  We hiked up to Tom’s Thumb and back down, taking only a few excursions along the way.

Marilyn, near the beginning of the hike.  The trail is fairly steep with lots of switchbacks.  Elevation is gained quickly.

I took the climber’s access trail towards Gardener’s Wall.  Along the way, I got this photo of a climber approaching the belay station on Hanging Gardens (5.5).  If you look closely, you can see a pair of connected chains about seven feet above the climber’s head.  The guy leading it really sewed it up – I think there are at least eight pieces of protection visible in the photo.

A side view of Gardener’s Wall, off to the left:

Marilyn stayed on the Tom’s Thumb Trail and got to Tom’s Thumb ahead of me.  In the photo below, Marilyn is standing on a rock to the right of Tom’s Thumb.

Another photo of Tom’s Thumb taken from a different location and framed so that the “thumb” is on the left rule of thirds line.  The RAW file for the photo below was converted using a custom color profile for the Sony NEX-7.  The NEX-7’s “Daylight” white balance setting was used for the majority of the photo, but a layer using “Shade” was used for the shady areas given them a somewhat browner look.  The opacity of a Mantiuk ’06 contrast equalization tone layer was set at only 20%.  The tone layer helps to explicate some of the detail in the various rock formations.

On the way back, we stopped by a cave dwelling complete with stove, picnic table and a bed made out of sand bags with a blanket spread over the top.  There are additional sand bags filling in a hole in the back of the cave and more near the entrance, probably intended to block wind and rain.

Pinnacle Peak, Troon, and some other small mountains (of which I do not know the names):

One of Marilyn’s photos, taken with the RX100:

A photo of me photographing Tom’s Thumb:

A photo of me with Tom’s Thumb in the background:

Below is a photo of “Glass Dome”.  I’m not sure how it got its name as it’s not really a dome and it’s made from granite instead of glass.   It’s just off the Tom’s Thumb Trail somewhat before the turn off for the climber’s access trail to Tom’s Thumb proper.  It’s a fairly large formation, but is quite a lot smaller than Tom’s Thumb.  (Tom’s Thumb requires two ropes to descend (rappel) from the top.  Glass Dome only requires one.)


Nick atop Sunrise Peak

More photos from Saturday’s hike with Nick and Marilyn.  These were all taken from Sunrise Peak.

A view of the Fountain Hills, the Fountain, and Four Peaks in the distance.

Another, closer, view of Fountain Hills and Four Peaks from a somewhat higher vantage point.

Red Mountain and Saguaro

I got this photo yesterday while hiking the Sunrise Trail with Nick and Marilyn.

Nick had asked me, yesterday, about the “enhancements” used to create some of my photos.  The answer was highly technical, so I just said “a lot”.  For the above photo, I did the following.

  1. I processed the RAW file with the photo twice and brought each image into GIMP as a separate layer.  I used an appropriate exposure compensation value for the background with the white balance set to “Daylight”.  I processed the image a second time for the saguaro with the white balance set to either “Cloudy” or “Shade”.  I probably used “Cloudy” because “Shade” usually makes things too red for my liking.  For some photos, I may process the RAW file additional times with different exposure values or I may use one of the (exposure) bracketed files showing (roughly) the same shot.  (Additional work – alignment – is required when I process a different exposure.)
  2. I placed the saguaro layer on top and carefully created a layer mask so that just the saguaro would be visible from that layer.  The underlying layer had a very dark, almost black, saguaro due to being underexposed.
  3. When this is done, there is frequently some light fringing around the border of the mask.  I touch this up by painting into the layer mask with a partially opaque brush.  I’ll vary the brush size and degree of transparency depending upon the area under consideration.
  4. At this point, I hopefully have an image which could stand on its own without any additional work.  However, I’ve found that detail is increased if I add a tone layer created using the Mantiuk ’06 tone mapping operator.  So, I run the tone mapping operator on the RAW file and bring that result into GIMP as yet another layer.  This layer is placed on top.
  5. I disable the tone layer momentarily and create a “color” layer from the bottom-most two layers.  These were the layers that I had originally processed from the RAW file. I set the layer mode on the “color” layer to Color.
  6. The resulting image often looks too harsh.  In particular, there are frequently some white areas, often in sand or foliage, that appear too bright.  I create a layer mask for the tone layer and partially mask these areas exposing the results of the original two layers.   I will also often mask out the sky as it often appears quite blotchy.  If the sky has interesting clouds, tone mapping will sometimes help to explicate those clouds; in those situations, I’ll often leave some or all of it in place.  But even then, tone mapping can cause excessive sharpening.  Experimentation is required to find just the right level of masking.
  7. I create another new layer using “New from Visible”.  This layer will combine everything that can be seen in the image so far.  I use the “Curves” tool on this layer and make minor tonal adjustments.  I try to keep these minor though because some color changes will often occur at the same time.
  8. The top layer (upon which I had made tonal adjustments) is duplicated again.  I sharpen this layer using “Unsharp Mask”.  Portions of the image will often appear too sharp.  I create a layer mask and mask those portions out, exposing or partially exposing the unsharpened layer underneath.
  9. The image is written out three times, once in GIMP’s native (XCF) format, once as a JPEG file at full resolution, and a third time as a JPEG file that’s 1080 pixels high.  I’ll use this latter file in my blog posts.  All layers that I used in creating the image are preserved in the XCF file.  This allows me to go back and tweak parts of the image if I should decide that I don’t like it for some reason.  (This happens with some frequency.)

This is what the layer dialog looked like when I was done with this photo.  For some photos, I will end up with ten layers or more.