Month: October 2012 (page 1 of 3)

Halloween 2012

Mara sent me this photo of Katie trying on costumes in an attempt to look like Gottfried Leibniz for Halloween.  I’m not convinced that Katie’s friend thinks this is a good idea

Marie is working on the pumpkin in the photo below just as Callisto escapes the house.  Molly is looking on from Marie’s left.

Tiger ran outside too.  Joe caught Tiger and made him pose for a photo.

Photos of Marie just prior to leaving to meet her friends for trick-or-treating.  (I’m very happy with the way the first photo turned out.  I’m less happy about the second due to it not quite being in focus.)

Mara sent me another titled “Leibniz after a Long Day”:

The pumpkin that Marie was carving earlier in the day…

Below is a simpler version of the above photo.  It’s the -3 EV layer only.  The only thing I did to it was run unsharp mask on it.  The photo above was made from four exposures and three tone layers.  I ended up interposing yet another gray (partially transparent black) layer on top of the tone layers and masked it to show just the pumpkin since the rest of the scene ended up being too bright and distracting.  That mostly grey layer ended up darkening the non-pumpkin portions of the scene making them less distracting.  The nice thing about it is that, using the opacity slider, it’s possible to make it as light or as dark as we want.

Joe reads while waiting for trick-or-treaters.  It must have been a very good book because he hardly moved at all during that 30 second, f/10 exposure at ISO 100.  (The exposure for the pumpkin was only one second.)


Nick atop Sunrise Peak

More photos from Saturday’s hike with Nick and Marilyn.  These were all taken from Sunrise Peak.

A view of the Fountain Hills, the Fountain, and Four Peaks in the distance.

Another, closer, view of Fountain Hills and Four Peaks from a somewhat higher vantage point.

Red Mountain and Saguaro

I got this photo yesterday while hiking the Sunrise Trail with Nick and Marilyn.

Nick had asked me, yesterday, about the “enhancements” used to create some of my photos.  The answer was highly technical, so I just said “a lot”.  For the above photo, I did the following.

  1. I processed the RAW file with the photo twice and brought each image into GIMP as a separate layer.  I used an appropriate exposure compensation value for the background with the white balance set to “Daylight”.  I processed the image a second time for the saguaro with the white balance set to either “Cloudy” or “Shade”.  I probably used “Cloudy” because “Shade” usually makes things too red for my liking.  For some photos, I may process the RAW file additional times with different exposure values or I may use one of the (exposure) bracketed files showing (roughly) the same shot.  (Additional work – alignment – is required when I process a different exposure.)
  2. I placed the saguaro layer on top and carefully created a layer mask so that just the saguaro would be visible from that layer.  The underlying layer had a very dark, almost black, saguaro due to being underexposed.
  3. When this is done, there is frequently some light fringing around the border of the mask.  I touch this up by painting into the layer mask with a partially opaque brush.  I’ll vary the brush size and degree of transparency depending upon the area under consideration.
  4. At this point, I hopefully have an image which could stand on its own without any additional work.  However, I’ve found that detail is increased if I add a tone layer created using the Mantiuk ’06 tone mapping operator.  So, I run the tone mapping operator on the RAW file and bring that result into GIMP as yet another layer.  This layer is placed on top.
  5. I disable the tone layer momentarily and create a “color” layer from the bottom-most two layers.  These were the layers that I had originally processed from the RAW file. I set the layer mode on the “color” layer to Color.
  6. The resulting image often looks too harsh.  In particular, there are frequently some white areas, often in sand or foliage, that appear too bright.  I create a layer mask for the tone layer and partially mask these areas exposing the results of the original two layers.   I will also often mask out the sky as it often appears quite blotchy.  If the sky has interesting clouds, tone mapping will sometimes help to explicate those clouds; in those situations, I’ll often leave some or all of it in place.  But even then, tone mapping can cause excessive sharpening.  Experimentation is required to find just the right level of masking.
  7. I create another new layer using “New from Visible”.  This layer will combine everything that can be seen in the image so far.  I use the “Curves” tool on this layer and make minor tonal adjustments.  I try to keep these minor though because some color changes will often occur at the same time.
  8. The top layer (upon which I had made tonal adjustments) is duplicated again.  I sharpen this layer using “Unsharp Mask”.  Portions of the image will often appear too sharp.  I create a layer mask and mask those portions out, exposing or partially exposing the unsharpened layer underneath.
  9. The image is written out three times, once in GIMP’s native (XCF) format, once as a JPEG file at full resolution, and a third time as a JPEG file that’s 1080 pixels high.  I’ll use this latter file in my blog posts.  All layers that I used in creating the image are preserved in the XCF file.  This allows me to go back and tweak parts of the image if I should decide that I don’t like it for some reason.  (This happens with some frequency.)

This is what the layer dialog looked like when I was done with this photo.  For some photos, I will end up with ten layers or more.

Football Game / Band Performance Photos

Marie played with the Fountain HIlls HIgh School Band on Friday Evening during the game between the Falcons and the Trojans.  Below is a gallery with photos from the game.

Friday Fitness Hike

Cooler weather is bringing out more people.  On Friday, we had a total of nine on our hike, Dennis, Sharon, Sue, Janet, Amy, Bob, Nancy, Nick, and me.  This is also the order of the people in the photo below – except for me, I took the photo.

We hiked out Pemberton and explored a wash near the homestead of the old ranch.  It’s a deep wash with high vertical banks in many places.  Here, part of the group crouches in a small hollowed out space at the side of the wash.

The wash is fairly wide, though you do have to squeeze past vegetation from time to time.

As noted earlier, there are several areas where erosion has created high vertical banks.

One of our group found an antler, likely left by a mule deer.

Amy sent me this photo of holes in the ground.  Dennis and Sharon said that they were made by antlions.

Another section of the wash with particularly high banks.  It’s almost a canyon.

Below is another photo from Amy.  We encountered a section of wash where we needed to do bit of scrambling to proceed further.

Another couple of views of the wash:

After our wash exploration, Nick, Janet, Bob, and I hiked a loop consisting of Tonto Tank, Pemberton, the Bluff Trail Wash, Granite, Wagner, and the Tortoise Trail.  Our total distance for the day was 10.5 miles.

Sigma 50-500 Test Shots

These are test shots from my recently purchased Sigma 50-500mm f/4.6 – f6.3 Sony Alpha mount lens.  These were taken with my NEX-7 with an LA-EA2 adapter.  The LA-EA2 adapter converts Sony E-mount to Sony Alpha-mount and provides translucent mirror technology for faster and more accurate focusing.

The focusing does indeed work well and fast.  There are times when my 18-200 E-mount lens doesn’t want to focus, particuarly on distant low-contrast objects.  I didn’t have this problem at all with the Sigma Lens using the LA-EA2 adapter.

The focal length on each of these shots was 500mm, or an equivalent of 750mm on a 32mm camera.  Aperture on all shots was set to f/6.3, which is the widest aperture possible at that focal length.  All shots were hand-held with the optical stablizer turned on to position 1.  Sigma claims that OS provides up to four stops of stabilization.

I used UFRAW to process the RAW files from the camera and then used GIMP to do a minor amount of post-processing.  This consisted of adjusting contrast somewhat and then sharpening it using unsharp mask.

UPS Airplane.  1/500 sec, ISO 200, 100% crop:

Delta Airplane. 1/500 sec, ISO 200, 100% crop:

“Big Tom”.  1/80 sec, ISO 1600, cropped and scaled.

Moon. 1/500 sec, ISO 200, cropped and scaled only slightly.


Sunset at Sunrise

Marilyn and I hiked the Sunrise Trail on Saturday afternoon, hiking all the way up to Sunrise Peak.  As we were hiking down from the peak, I took this photo of the sunset.

I got this photo earlier in the hike.  Red Mountain is visible about a third of the way over from the right edge of the photo.  The very tip of Weaver’s Needle is also barely visible in this photo.

Here, Marilyn is hiking ahead of me on the Sunrise Trail.

As I was hiking up, I noticed a large rock pile ahead.   It took a while to get to it, but this is what it looks like as the trail passes it.

A closer view of a few of the rocks in the above photo:

A view looking back down the trail.

Marilyn, hiking up the trail.

A view of the fountain in Fountain Hills.

Looking south from just below Sunrise Peak:


Marie is a Regional Winner for the Lions Club Peace Poster Contest!

Marie told us, in her usual understated way, that she was a regional winner in the Lions Club Peace Poster Contest.  She did this by handing her Mom a permission slip for proceeding further into the contest.

Marie tells us that she will probably be ineligible to proceed much further in the contest due to being too old by about a month.

Here, below, is a photo of her contest entry.  It’s actually a fairly sizable poster that she drew using colored pencils.

Scottsdale, after Sunset, from the Sunrise Trail

I got this shot on Saturday while hiking back on the Sunset Trail with Marilyn.  We came to an overlook area and saw the lights of Scottsdale along with a colorful, post-sunset sky.  I rested my camera on a large metal toolbox that the city keeps out there.  Presumably it has shovels, picks, and the like for trail maintenance purposes.  Anyway, the first several tries didn’t work out because I still had to level the camera and I was trying to do so by supporting the camera and lens with my fingers.  I finally got two rocks that I positioned in between the top of that metal toolbox and the camera.  It wasn’t perfect, but it allowed me to hold the camera steady enough to get the photo below.

This photo was created using three exposures at ISO 200, f/4.0, with exposure times of 1/2 second, 2 seconds, and 6 seconds.  I first blended the exposures together by hand.  From this, I created a color layer.  I interposed a tone layer set at 50% opacity above the original three layers that I had blended earlier and below the color layer.

The tone layer was created by running the Mantiuk ’06 contrast equalization algorithm on the RAW file from the lightest (longest) exposure.  Ideally, you’d use all three exposures to create the tone layer.  I had tried this, but did not get good results due to a slight misalignment of the three images.  I mainly wanted the tone layer to explicate foreground detail, so I used that exposure to create the tone layer.

I have been asked about that big barren space is between the lights near the horizon and the lights nearer to the camera.  This is what I’ve figured out…

First, it’s important to know that we’re looking south and somewhat west in this photo. You can see that the sky is brighter at the far right in the photo. That’s where the sun had set perhaps 20-30 minutes before the photo was taken. (It got quite dark perhaps another 20 minutes after taking that photo – dark enough that we got out our headlamps so that we could be more certain of our footing on the way back. We thought we were locked in at the parking lot too, but luckily the gate senses vehicles that are trying to get out and automatically opens.)

Shea Blvd is the big, well lit road in the photo. If you start at the left edge of the photo, it starts a little over half way up and extends across most of the photo, angling slightly upward as you follow it to the right. The hill to the right in the immediate foreground eventually blocks our view of Shea Blvd. If you follow Shea Blvd from the left of the photo, you’ll see the lower slope of a small mountain just above the road – to the south. There is a small road which intersects Shea that’s visible in the photo. It goes south (and north) of Shea and runs between that small mountain and a hill to the west. That small road is 136th Street.

The big cluster of lights in the center of the photo, just to the north of Shea Blvd is Mayo Clinic. There are some residential areas which are part of Scottsdale just south of Shea in that photo, but they don’t extend very far south. Once I found these landmarks, I was able to look at a map to figure out the rest. Here’s a link to a map showing Shea and 136th St. You’ll have to zoom out a bit to see more of the surrounding area.

There is a big empty looking area south of those residential areas which are, in turn, south of Shea.  This sizable tract land used mostly for agricultural purposes.  There are some homes there too, but it’s much less densely populated than the cities which surround it. It belongs to the Salt River Pima-Maricopa Indian Community. To the south of that – i.e. the lights further on up the photo towards the horizon – are the cities of Mesa and Tempe. Mesa is more to the left and Tempe is more to the right. I can’t say for certain where one ends and the other begins – it may even be that Tempe isn’t visible at all in the photo. I think too that some of the southern portions of Scottsdale are visible off to the right. If you look to the far right, you can see a small portion of Camelback Mountain at the edge of the photo.

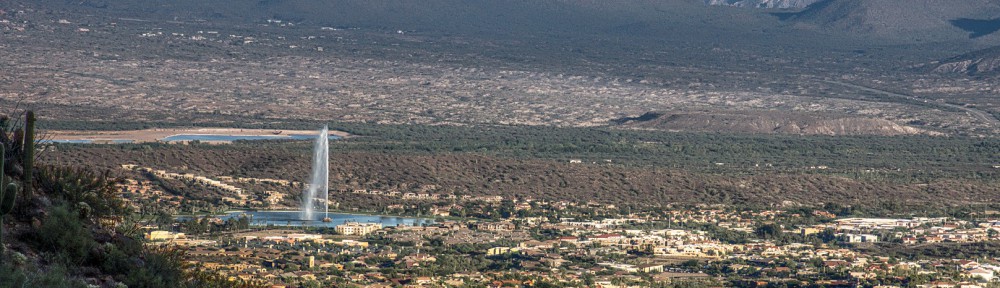
Here is another photo looking in the same direction, but taken from a different overlook.  I don’t like this shot as well, but it does show what the area looks like in the daylight.

Friday Fitness Hike

Today’s hike went up and down Lousley Hill.  At the bottom of the hill, we hiked down Lousley Wash and made our way over to the Verde Trail.  We then picked up the North Trail and took the Chuparosa out to Pemberton.  We completed our loop by taking Lousley Wash back to the Lousley Hill trailhead.    Total distance covered was almost seven miles.

There were eight of us on the hike today: Me, Marilyn, Linda, Janet, Bob, Sue, Sharon, and Amy.

A view from Lousley Hill:

Hiking up Lousley Hill:

At the top.  From right to left are Sharon, Linda, Marilyn, Janet, Amy, Bob, and Sue:

Another photo from the top, but this time Amy is taking the photo and I’m standing between Bob and Sue:

A view of Tom’s Thumb from the Verde Trail:

A view from the North Trail:

An eroded hillside along Lousley Wash: