Tag: HDR (page 1 of 2)

Park Avenue in the Morning – Four Edits

I’ve been processing my photos with a variety of software.  I’ve been shooting RAW for a little over a year now.  When I shot JPEG, I did all of my editing with GIMP.  When I started shooting RAW, I used ufraw to process the RAW file and GIMP for the rest of the editing. I’ve also used Photivo and RawTherapee.  I’ve also played around with Darktable, but I don’t think I’ve ever published a photo processed using it.

I recently put together a Windows machine so that I could try out some commercial photo processing packages too.  The two that I’ve tried so far are Lightroom 5 and Photomatix. Lightroom can be used to develop RAW images.  It has enough functionality that I’m able to edit many photos without having to also invoke an external editor.  (I’ve installed GIMP on my Windows machine so that it’s available when I need it.  I’ve also installed Photoshop CS6, but have not become proficient with it yet.)  Photomatix can be used to create HDR images and tonemap them.  I posted a photo recently which I processed with Lightroom and Photomatix.

I thought it might be interesting to edit, using different methods, a bracketed set of exposures taken in predawn twilight at Arches National Park.  I have five photos altogether, one which was processed with GIMP just to show what the RAW file looks like without any editing, another which was processed with RawTherapee and GIMP, another which was processed with Lightroom 5, and two which were processed using Lightroom and Photomatix.

This is the middle exposure processed using ufraw only.  I used ufraw to set the color temperature, exposure, and added a tiny bit of saturation.  I exported it to GIMP, but only used GIMP to scale it and save the file as JPEG.  In my opinion, it’s not a very interesting picture.  I should note that I’ve processed lots of photos that I like using ufraw; I chose ufraw for this task because it’s easy to make it show what a RAW image looks like prior to much if any editing being done.  Some of the other programs apply presets which try to make the image look good at the outset.  An out-of-camera JPEG image would likely have a similar tonality to what is shown here, but it would have been sharpened and saturated more.  (So an OOC JPEG might look slightly better, but not much.)

2013-06-04-DSC09069-ufraw_noedits-medium
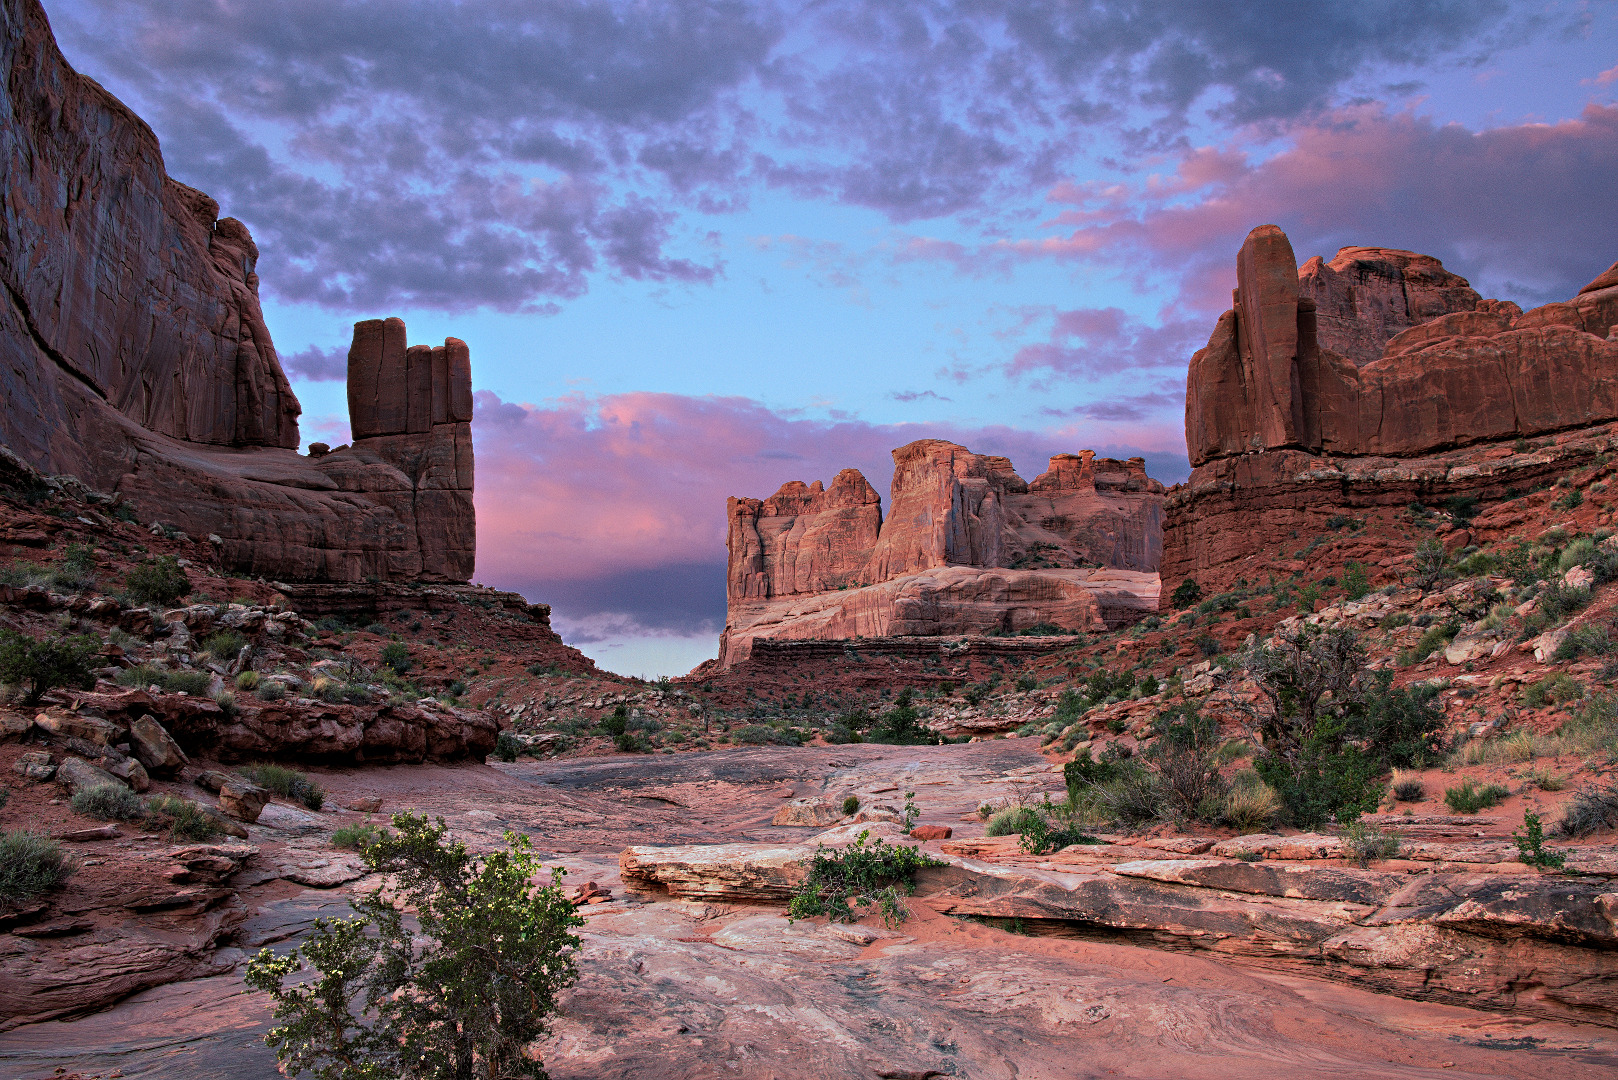
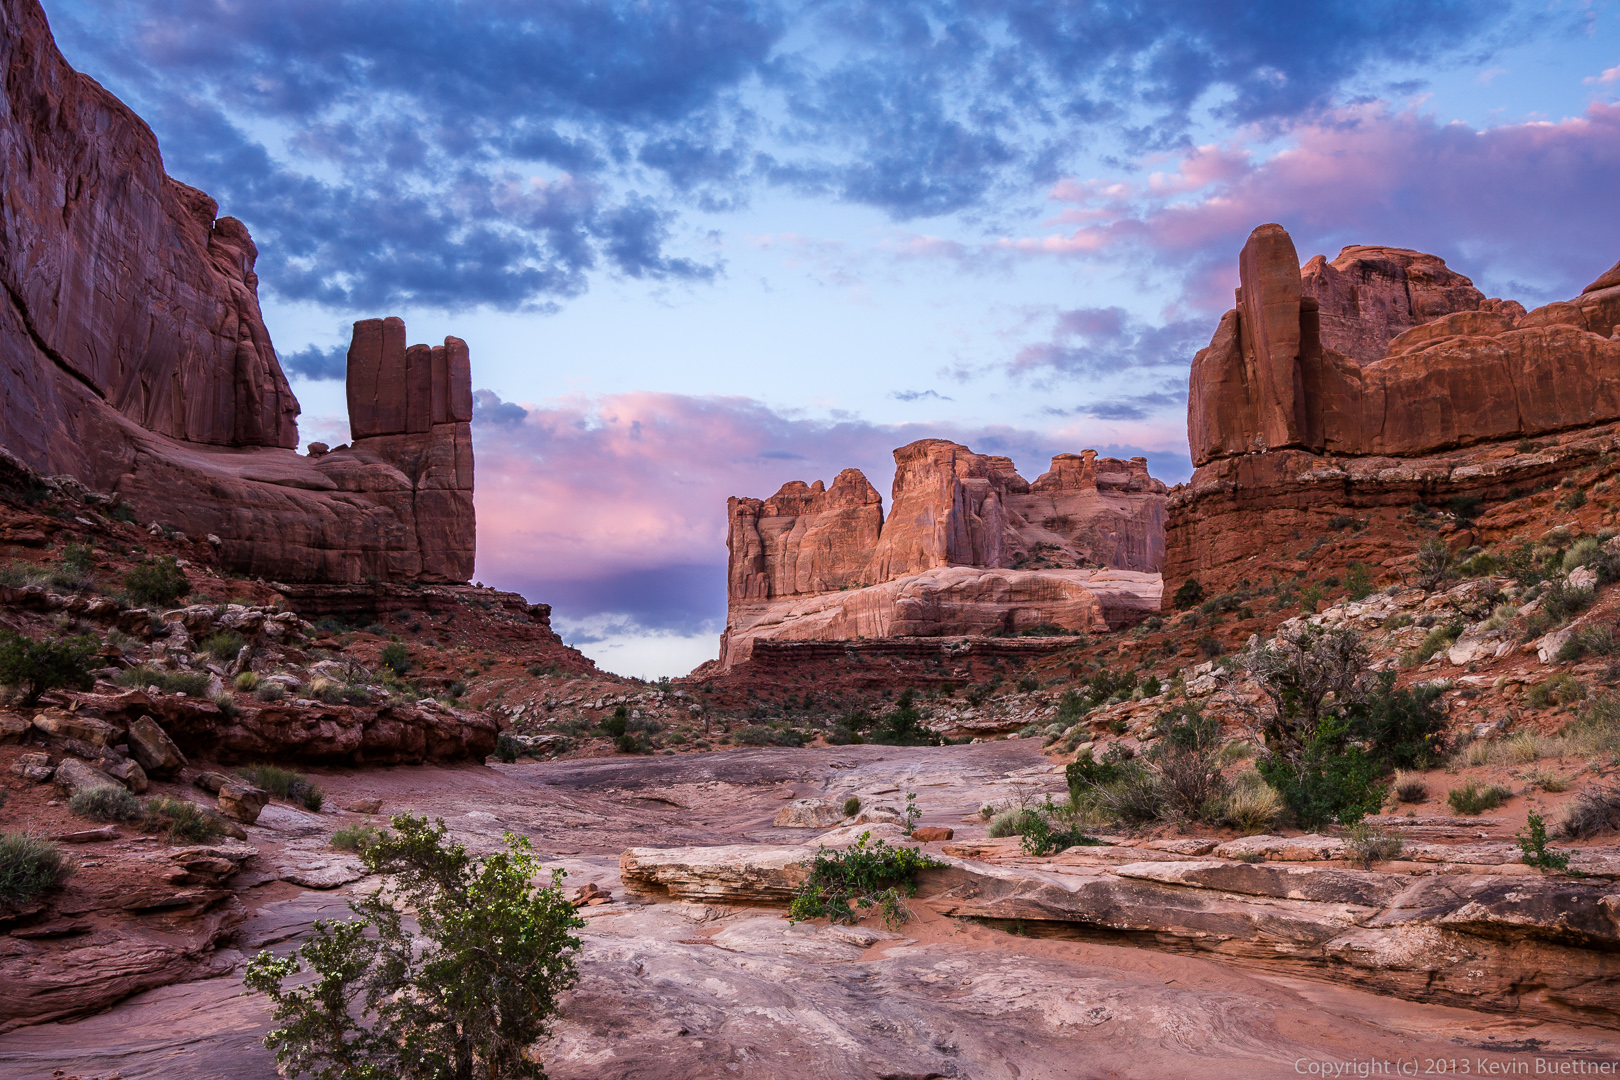
I processed this photo, below, in RawTherapee and GIMP using the darkest (-2 EV) and brightest (+2 EV) exposures.  The dark exposure was mostly used for the sky and the bright exposure was mostly used for the foreground.  I masked in a bit of the dark exposure to darken some of the foreground where I thought it was too bright.  One of the mistakes I made in processing this image was forgetting to turn off sharpening in RawTherapee.  It’s on by default and I forgot to turn it off this time.  I like this edit, though there are some things that I like about the Lightroom edit better.  (And vice versa.)

2013-06-04-DSC09068-medium
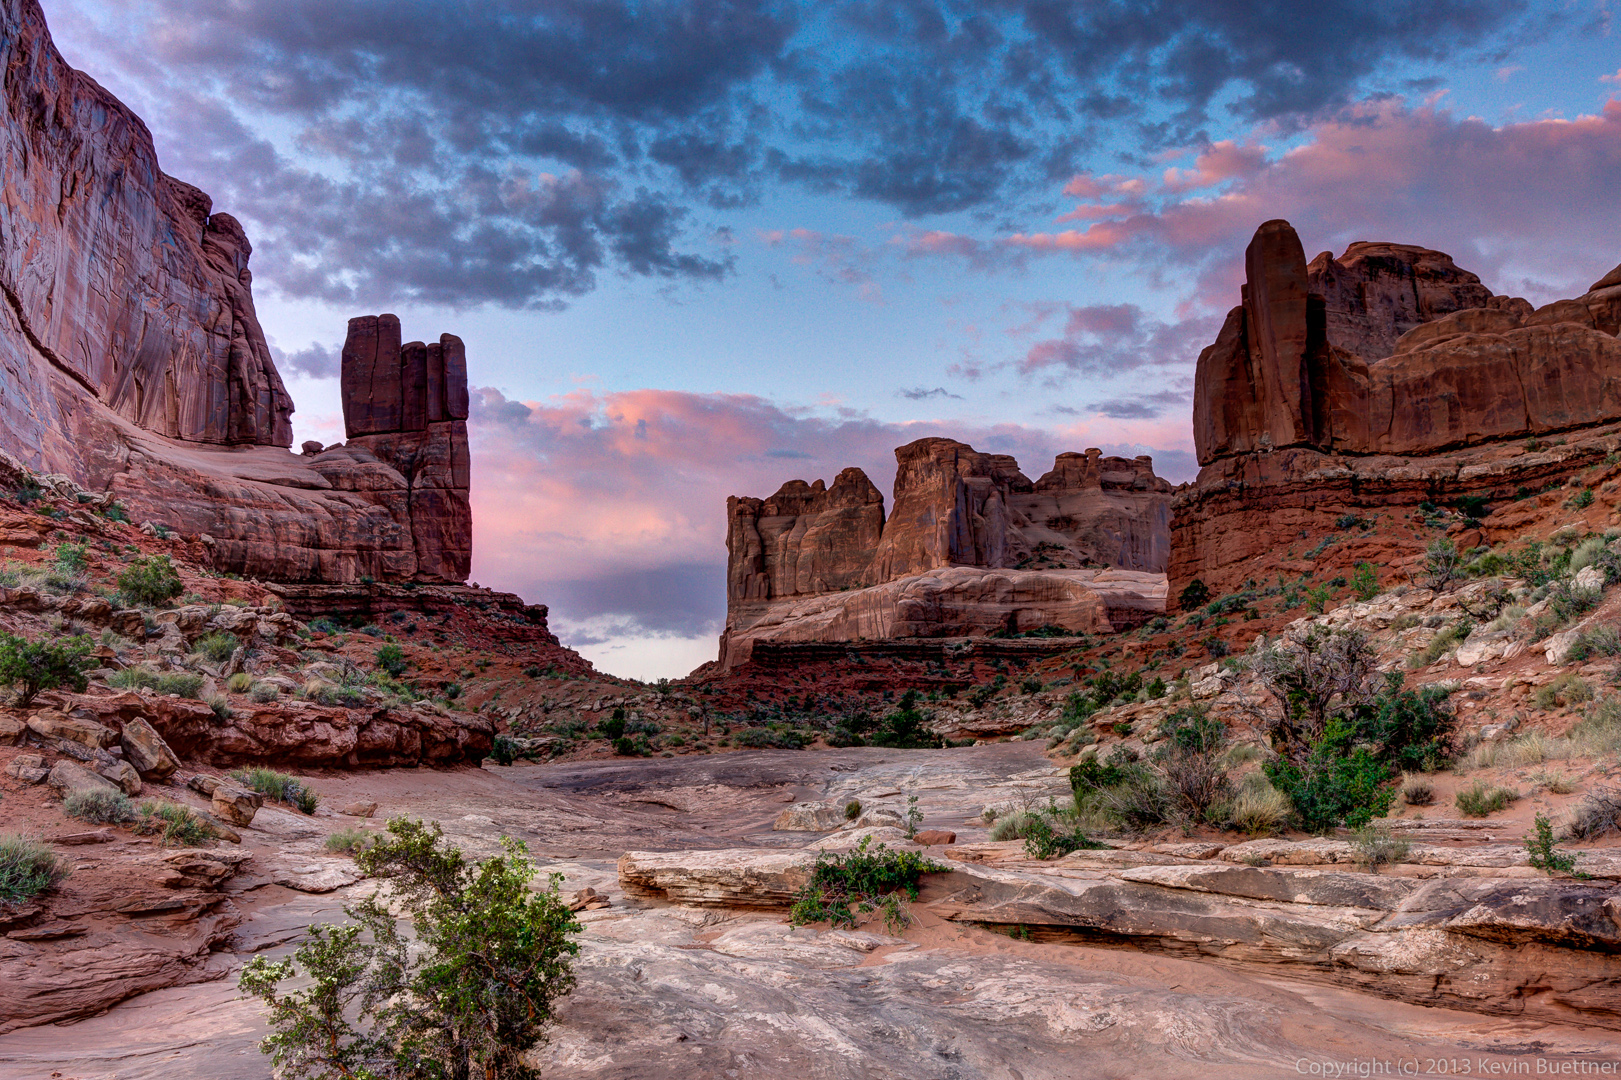
This photo, below, was processed using only the middle exposure in Lightroom.  (To the best of my knowledge, Lightroom is not capable of combining multiple exposures directly. You have to use some other program to help with this task.)  But, luckily, there is sufficient information in the RAW file that I used to come up with a reasonable looking edit.

20130604-DSC09069-medium


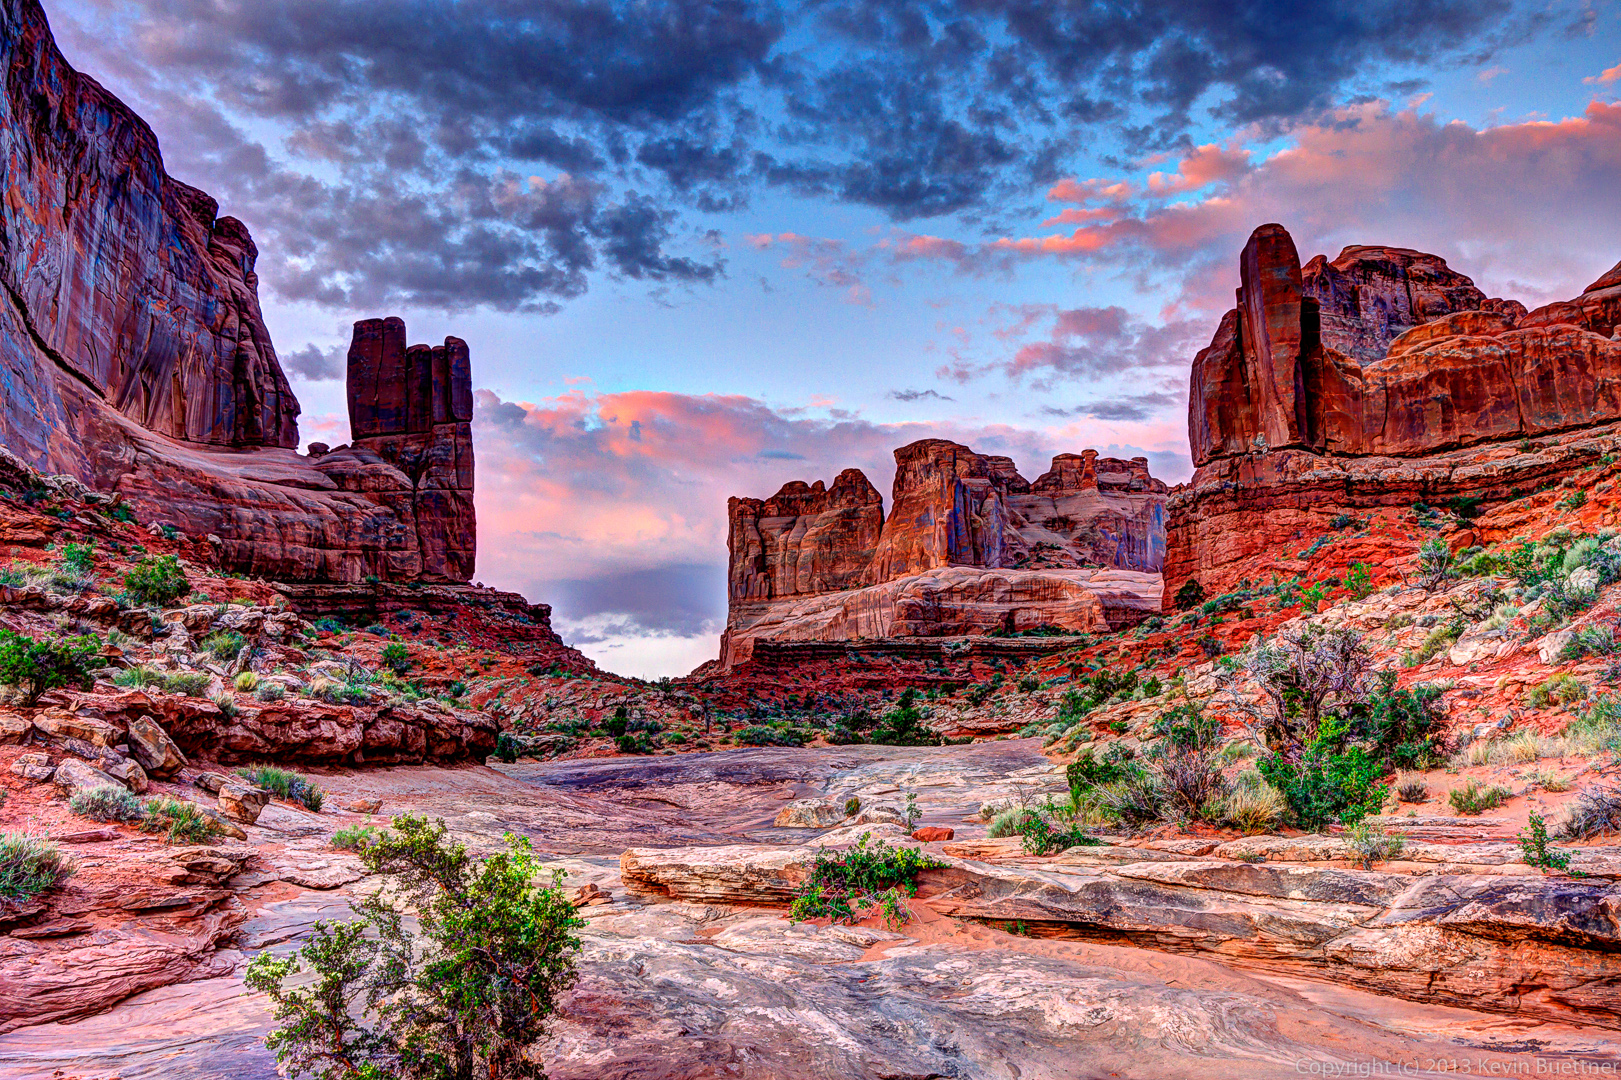
In this photo, below, I zeroed out the settings in Lightroom, set the color temperature and turned on some noise reduction, applied the lens correction, and then exported three bracketed exposures (0EV, -2EV, and +2EV) to Photomatix.  Photomatix offers 32 presets, some of which are boring and some of which are pretty wild.  I chose the preset named “Adjusted”, tweaked the settings a bit, and then made some further adjustments once the output was imported back into lightroom.  (As I recall, the only significant change I made was to darken an area of the foreground at the left in the image.)  This image is okay, but I like my hand edits better.

20130604-DSC09066_7_8-mediumThis final image, below, was also created using Photomatix.  I used the preset “Surreal 2” for this one.  I prefer any of the three edits above to this one, but it’s kind of fun to look at anyway.

20130604-DSC09069_70_71-medium


Laundry

This photo was taken back in June during our visit to Moab.

I had visited Upheaval Dome earlier in the day, but was not happy with the results.  Yet some of my photos from the same day were pretty good.  I also got some decent photos of Upheaval Dome last year.  I remembered that I had used a polarizing filter on the lens that I had used the year before, but I didn’t yet have one for the wide angle lens that I was using for my shots of Upheaval Dome.  I stopped into the camera shop to try to purchase one, but they had just closed.

On the way back to the truck, we noticed this Laundry.  I took a photo of it, but didn’t process it until now.  I shot it hand-held and the ISO ended up being up at 1600 with a lot more noise than I’d like.  I used Lightroom to set the color temperature and do some noise reduction and then imported the three bracketed photos that I had taken into Photomatix.  I played around with the settings a bit and then tweaked it a bit more in Lightroom.

20130604-DSC09440_39_38-medium

The Fountain at Night

The photo below is of the Fountain Hills fountain and environs as it appeared last Sunday just after 8:00pm.

The image below was blended in GIMP using three of the ten exposures that I took using my Sony NEX-7.  One of the problems I had with tone mapping the image using HDR software is that there’s a lot of noise in the immediate foreground.  Tone mapping it with Fattal made that noise even more evident.  Most of the other tone mapping algorithms had difficulty with the dynamic range.

For the GIMP blending, I ended up using RawTherapee on the second lightest exposure to lighten up the foreground just enough so that it’s not completely dark.  (The brightest exposure was shot at a higher ISO and had even more noise.)  If you look very closely, you can see some detail there.  It’s very dark though, but it was that way in real life too.  I had to shine my headlamp up at the saguaro off to the far right to make sure that it was in the frame.  That sequence of ten shots took most of the fifteen minutes that I had to get the various exposures of this scene.  (The fountain only runs for fifteen minutes beginning on the hour.)

Below is another result that I got using Mantiuk ’08 with some additional GIMP edits afterwards.  This image is not as sharp and the town lights are too bright, in my opinion.


Sunrise from the Balcony

I’ve been experimenting with RAW files recently.  For the shot below, I used the NEX-7’s exposure bracketing to get three exposures.  Then, using the brightest and darkest exposures, I adjusted the exposure compensation for each so that there were no clipped highlights for the dark exposure and very few clipped shadows for the bright exposure.  There was a 4.5 stop difference between the two exposures  I saved the results and fed those files into Luminance HDR using Fattal to do the tone mapping.  I got an interesting result almost immediately.  While I do wish the sky was a bit more muted, I do like how the foreground details turned out.

I got some reasonable looking results using Ashikhmin too.

And, finally, here is a quick edit where I blended the two layers together in GIMP:


Fountain Park Photos

On Saturday afternoon, Marie, Marilyn, and I visited the Fountain Park.  I went with the intent of scouting a good location to set up the tripod for taking a nighttime photo of the fountain.  I wasn’t sure whether I would get a chance to do it on Saturday, but I brought along my NEX-7 and the tripod just in case.  I brought a small point and shoot camera, the Sony RX100 for my scouting.  All but the last two photos shown here were taken with the RX100.

We got there shortly after 5:00pm, but before 5:15.  The fountain was not running.  It normally starts on the hour and runs for fifteen minutes.  It does not run, however, if it’s excessively windy.  It was fairly windy when we got there, so perhaps that’s why it wasn’t running.  You can see the wind blowing her hair in these photos of Marilyn:

I took photos of the fountain lake for a while and of some of the plants along the Overlook Trail.  When I got back down to the car, it was 6:00pm.  So I hiked back up the trail and took some more photos.  Here’s one of the fountain.

When I got to this cactus, I knew I had found a spot from which I wanted to try to get a photo of the fountain at some point.  The sun was mostly behind the clouds, but was still pretty bright.  My Sony RX100 was in auto-HDR mode for this shot.  The HDR images that it produces are often fairly bland, but they often contain enough detail for what would normally be either overexposed or underexposed areas for me to be able to do something with the image later on.  That was the case here.

As I walked back down the Overlook Trail, I got this shot where it appears that the sun is trying to split the clouds.

When I got back down to the grassy area near the lake, I found that Marie had found a tree to play on.

When I was done taking these photos, it was starting to get dark.  We were only about twenty minutes away from the seven o’clock fountain.  The sky still looked cool, so I grabbed my NEX-7 and the tripod and headed back up the Overlook Trail to the spot next to the saguaro that I had identified earlier.  I took a bunch of bracketed exposures of the fountain.  I messed up on the first few sets because I had forgotten to take the camera off of auto-ISO.  Fortunately, I still had some time left, so I set the camera on ISO 100, and was able to take the exposures which formed this photo, below.  I took eleven exposures total, ranging from +5EV to -5EV in one stop steps.  I only ended up using seven of them because I didn’t see anything useful in the top two and bottom two.  I describe more about how I created this image in an earlier post.  (Note: I’ve since re-edited the image and have put a new one here in place of the original.  The original is still available in that earlier post.)

Here’s another HDR shot of the fountain.  This was from one of the sequences shot using auto ISO.

I’m still going through the images that I took that day.  If I find anything else worth showing, I’ll add it to this entry.

Fountain After Sunset

I wasn’t very happy with the Fattal tone mapping on my HDR Fountain photo.  I experimented with different tone mapping algorithms and parameters to those operations and eventually settled on Durand.  According to Parameters for tone mapping operators, Durand “produces the most realistic pictures. No extreme effects, but very nice output with lots of details in the picture.”  I used the following parameters with Durand:

  • Base Contrast: 4.4
  • Spatial Kernel Sigma: 7.0
  • Range Kernel Sigma: 5.1
  • Result Size: 6000×4000
  • Pre-gamma: 0.52

I didn’t change any of the levels or gamma in Luminance HDR.  Instead, I used GIMP and treated the HDR result as if it were an image that came out of my camera.  I employed the usual techniques of making layers, creating layer masks, and setting the layer modes to achieve the effects that I’m after for certain portions of the image.

Here’s the result:

Fountain after Sunset, tonemapped using Fattal

The parameters for the Fattal tone mapping in the photo below are as follows:

  • Result Size: 1536×1024
  • Pre-gamma: 1.00
  • Alpha: 0.10
  • Beta: 0.94
  • Color Saturation: 0.90
  • Noise Reduction: 0.00
I didn’t change either gamma or the levels after the tone mapping operation.  Instead, I edited the image with GIMP, duplicated the layer and set the layer mode to multiply.  This worked fairly well, but for the upper half of the image ending up darker than I would have liked.  So I created a graduated selection which ran from mostly invisible at the top to fully opaque about a third of the way from the bottom.  I set this as the layer mask on the “multiply” layer.  The image looked much better.
There was a large halo around the big saguaro in the foreground just along and slightly above the horizon.  I found the exposure from the original seven used to create the HDR image, scaled it to the correct size and then copied it over as a new layer.  I created a layer mask with the halo area and then adjusted the transparency until it looked right.  The color wasn’t quite right along the horizon (and still isn’t, but it’s better), so I used curves to increase the amount of red in that area and decrease the amount of green.
I discovered that, when using Fattal, choosing the result size makes a big difference.  I had been choosing a result size of 6000×4000 which was the size of the exposures that came out of the camera.  But doing this resulted in an image that looked over-sharpened when viewed at a scaled resolution.  I tried for a long time, but failed to come up with a set of parameters which looked really good with that large result size scaled down to something smaller.  If you view the 6000×4000 result unscaled, it looks pretty good.
The image below will look best if viewed at its native resolution of 1536×1024.  It will probably not look too good if the device upon which you’re viewing it scales it to some other size.

FH lights at night

Below is another HDR photo, though I’m not entirely happy with it.  It was taken from part way down Golden Eagle Blvd at a place that overlooks a good portion of the town.

I spent a long time playing with various tone mapping operators, but in the end chose Mantuik ’08 again, this time with a Color Saturation of 1.00, Contrast Enhancement of 1.51, Pre-Gamma of 1.3, and (post) Gamma of about 0.5.  (I forgot to record the precise value of the final brightness adjustment.)  In GIMP, I despeckled the road, ran unsharp mask on the entire image with a radius of 5, amount of 1.00, and threshold of 0.  I decreased the brightness of the sky using Curves and adjusted the contrast of the highway too using Curves.  I thought it would be cool to darken the road surface, but enhance the colors of the stripes.  (I’m recording what I’ve done here more for my benefit than anyone elses.)

While playing around with the various tone mapping parameters, I found that sometimes small changes in one parameter can lead to large changes in the resulting image.  I was able to get some reasonable looking results from Fattal, but it did not show much glow in the sky.  It looked just weird with a dearth of stars for no apparent reason.  The other thing about Fattal is that histogram usually has one big bump in it.  I find it difficult to do any further editing using Curves on such images.

Most of the tone mapping results contained  bright speckles on the road and other areas in the immediate foreground.  These are not evident or at least not obvious in the original exposures and I’m at a loss to explain them.  I was able to remove them by running GIMP’s despeckle filter with the Recursive box checked.  If I don’t allow it to run recursively, it removed some speckles, but seemed to add new ones for some reason.  I had to constrain the region in which I used the despeckle filter too as I found that it removed some of the lights and stars when running it on the entire image.

The glow in the sky is not due to a sunset, but rather the lights of Scottsdale.  The bright red house in the foreground really was that color, but only for one exposure.  I’m not sure why it’s a bright red in just that one exposure.  In the subsequent exposure, the house is no longer red, but it looks like the garage door has opened and green light is spilling out.  In all later exposures, the house is dark.

I’m note sure what HDR got me in this instance as I think I might’ve been able to obtain similar results by just using the brightest exposure.  I did some tone mapping operations where the lights were considerably more muted, but I ended up not using any of those results.

Crested Saguaro, Revisited

Several days ago, I took some photos of the crested saguaro near the parking area for the Dixie Mine Trail Head.  While I liked the night shot of the saguaro, I felt that I could do better.

So, last night, I decided to give real HDR photography a try.  I went out well after sundown and brought a tripod with me.  For the photo below, I used eight different exposures each taken one stop apart.  I turned off image stabilization, locked the focus, and shot at f/3.5 in manual mode.  The longest and brightest exposure was thirty seconds long.  I wanted to go even longer so that I could use a lower ISO than 400, but that’s the longest (non-bulb) setting that my NEX-7 has.  Each subsequent (and darker) exposure had the shutter open half as long as the previous exposure.  My NEX-7 does not have an auto-bracketing mode that can be triggered with a remote, so I manually adjusted the shutter speed between each exposure.  This is, of course, less than ideal because touching the camera in between exposures could cause it to move slightly.

I processed those eight exposures with Luminance HDR and used the Mantiuk ’08 tone mapping operation with color saturation set to 1.26 and contrast enhancement set to 1.11.  I’m not going to pretend that I know what these parameters mean or even if they were optimal for my photo(s), but I’m recording them here so I’ll know what they were if I want to try something like this again.

I had a problem with the stars in the resulting image.  The Earth’s position with respect to the stars changes moment to moment due to the rotation of the Earth.  This was evident after merging the eight images together.  For each star, there was a sequence of stars each offset from one another by a small but noticeable amount.  So, using GIMP, I edited back in the stars from the brightest of the eight images.  I think I could have tried to mask the sky for all but one of the exposures using Luminance HDR, but I’m better at using GIMP.

Here is a 1:1 crop of an interesting portion of the scene.  In the upper right, you can see a portion of the “crested” arm of the saguaro.

Update on 2012-08-22:

I learned recently that I didn’t check the correct box to cause the HDR software that I’m using to align layers.  In some instances this makes a big difference.  So I reran the Luminance HDR on the same set of exposures as before, this time telling it to use hugin align_image_stack.  It takes quite a while longer to do the processing but, in the case of the fountain photos, it was worth it.  When it finished, I had it use Drago for the tone mapping with the default parameters (Bias = 0.85 and Pre-Gamma = 1).  The output looked atrocious without any adjustment of the levels or gamma when it’s done.  Nevertheless, I wrote the file out as is, choosing to do those adjustments in GIMP.

In GIMP, I found that I got good results by simply duplicating the background and then using the multiply layer mode to combine them.  That result required only minor tweaking via curves.  After that, I replaced the sky with the brightest of the exposures used to form the image and ran curves on the sky, making the necessary adjustments so that I saw lots of stars.  Once that was done, I ran unsharp mask on the entire image with a radius of 8 pixels and an amount of 0.70.

The image below looks very similar to the one above, but it’s a bit sharper in some areas and I think the lighting and colors is better too.

Tone Mapping in GIMP using the GEGL Operator fattal02

GIMP 2.8.0 includes a new – well, new to me anyway – GEGL operator called fattal02.  It’s named after the lead author, Raanan Fattal, of the 2002 SIGGRAPH paper,  Gradient Domain High Dynamic Range Compression.  (The other authors are Dani Lischinski and Michael Werman ) I have not read this paper yet, but I have visited the site at that link and have looked at their Belgium House photos.  Their resulting photo is very impressive.

I also found this page, Parameters for tone mapping operators, which describes a number of tone mapping algorithms – not the details of the their operation – but when they’re useful and the type and quality of their output.  It also describes the parameters that control the operation of the algorithm and provides hints on ranges of values that might produce the most promising results.

Frank Dürr’s page, Comparison of Tone Mapping Algorithms, is a very nice introduction to why tone mapping is necessary and shows the results of some of the tone mapping operators.  (Added 2012-08-22.)

I tried out fattal02 on this scene, which is, yet again, a slightly different crop of a photo that I’ve been using for a number of experiments.  My first inclination was to use the same starting photo that I had been using for my c2g experiments, but I’m running GIMP 2.8 on Fedora 17 running in a virtual machine.  It works, but is by no means very fast.  Anyway, here’s the photo upon which I conducted my experiments:

Below is the result that I got by using Alpha=0.10, Beta=0.90, and Saturation=0.80.  I tried other values for Alpha, Beta, and Saturation that were close to these values, but only saw subtle differences in the output – sometimes, the differences were so subtle that I couldn’t see a difference.  I also tried a few values that were farther away, but the output was not as good, in my opinion.

I find it interesting that the color near an edge is either lighter or darker, depending on where it is, and then becomes either darker or lighter away from the edge.  The sky, for example, is pretty dark, but it lightens up considerably around the buildings and trees giving them a halo.  The walls of the building, on the other hand, are lighter in color, except near the edges where they generally darken.

I tried playing with this scene using the Curves tool after running fattal02, but I couldn’t do much with the whole scene.  The point of tone mapping, in some instances anyway, is to decrease the dynamic range of the image so that details can be seen on displays which also have a limited dynamic range.  This is definitely what happened here.  This is the histogram shown by the Curves tool:

I also tried selecting the sky by color, but this proved very difficult to do, in the fattal layer anyway, due to the fact that the color of the sky ended up being somewhat close to other colors in the scene.  However, it’s relatively easy to select by color in the original scene.  When I do that and play with the curves for one of the fattal02 layers, I can lighten the sky up like so:

There are two other tone mapping operations provided by GEGL, mantuik06, and reinhard05, but my early attempts at using them produced no useful results.  But, to be fair, I had not yet found the page which describes how the parameters should be set.