
Month: July 2012 (page 1 of 6)

There were five of us today for the Friday Fitness Hike, me, Marilyn, Bob, Janet, and Pat. Bob did indeed get a new bird, but he says it’s loud and that he needed the solace of a hike for some peace and quiet – or something to that effect anyway. Bob brought his friend Pat along this time. Pat says he’ll be joining us next week too.
Today’s hike started at the Trailhead Staging Area. We hiked a very short ways on Pemberton to the Tortoise Trail. We hiked all of the Tortoise Trail, crossed the main park road and got on the Wagner. We hiked all of the Wagner and then turned right on Granite. When we reached Stoneman Wash, we hiked the wash, downhill, back to Pemberton. From there it was less than a mile back to our vehicles. Total distance was just under six miles.
We had some nice cloud cover today which kept the hike somewhat cool for this time of year. The clouds also made for some nice photos…
Bob, as he often does, spotted a good photo opportunity. The sun was hiding behind some clouds showing some interesting rays of light. We’re in Stoneman Wash here. You can see Four Peaks off in the distance.

Another view of Stoneman Wash with the rest of the group hiking on ahead of me. I had fallen behind while taking some photos.

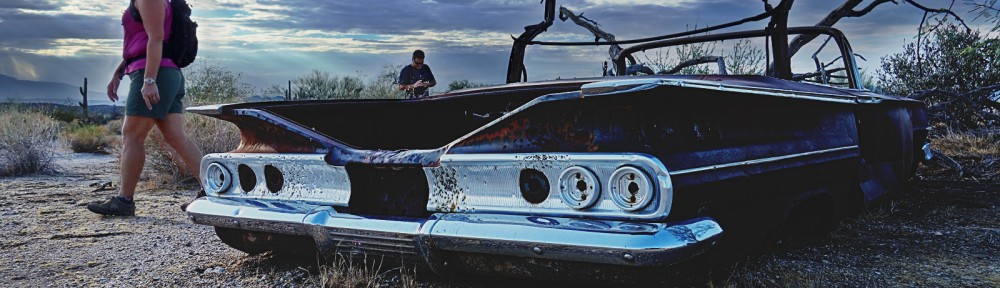
There’s the shell of an abandoned car from the late fifties or early sixties in the wash, but sometimes you have to look around to find it. We found it easily today as I had a waypoint set for it on my GPS. It’s amazing that the chrome is still very shiny after all of these years. Sue looked at this photo and told me that she thinks it’s a Chevy.

Another photo of Janet near the car.

Bob and Janet examining the car. They made them really big back in the day. It looked to be as long and as wide as one of today’s full size vans.

Nearing the end of Stoneman Wash:

A view from the Pemberton Trail:

The photo below is a late addition. I had worked on this one, but was not sure how well I liked it. I took another look at it today and decided that it’s not too bad. There was some bad lens flare off to the right in the photo. I spent some time using the clone tool and the healing tool, trying to touch it up, but in the end I just cropped it away. I think there are still a few lens flare spots in this photo that I did touch up, but I can’t tell where they are anymore.
The major problem with shooting into the sun without using some sort of filter (e.g. a graduated ND filter) is that the sun ends up blowing almost everything else out. For this photo, I had clouds obscuring the sun, but the sun is very bright and that area is still blown out. The foreground was very dark. I took this shot using the RX100’s auto HDR mode, but the foreground was still very dark. It took a bit of work to lighten it up – it doesn’t look great, but it’s acceptable. (I had this same problem with the first photo posted for this entry too.)

Joe came over yesterday to help his Mom with some chores. In this photo, he was helping his Mom move the futon from the workout room to the new guest room (which is Marie’s old room).

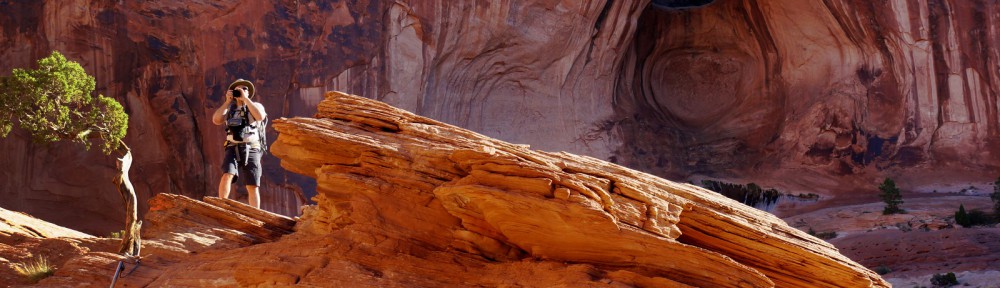
I made another pass through some of Marilyn’s photos last night and found a few that I like of Bow Tie Arch and one of Corona Arch.
Marilyn took this photo, in which I appear, on our hike out to the area in the morning. It appears that I was taking a photo of Marilyn at the same time as she was taking a photo of me!

This photo of Bow Tie Arch was taken late in the day. It shows more of the area than the rest of the photos. Corona Arch does not appear in this photo, but is only a short ways off to the right. When hiking out to Corona Arch, you pass in front of Bow Tie Arch, going from left to right in this photo. One of the things that I immediately found interesting about the scene was the discoloration or perhaps growth (lichen, perhaps?) where the water runs down when it rains. The dark streaks are either black or a deep blue depending upon how you view it.

Here’s a closer look at Bow Tie Arch and two of the small dry waterfalls below it.

Finally, here’s a shot of Corona Arch. What surprised me about this photo was how bright and golden the arch appeared even though the sun was on the other side. We had gone back later in the day to get photos of the arch from this angle thinking that the photos would be better. But this one was taken in the morning.

She was practicing the Maple Leaf Rag at the time. She’s beginning to work on The Easy Winners too. Minutes earlier, she was listening to John Arpin playing it to get a feel for how it goes. (She listened to a different version, one that we have on CD.) When Marie begins working on a piece, she tends to play it very softly, even though her Dad would like her to play it louder so that he can hear it too.

GIMP 2.8.0 includes a new – well, new to me anyway – GEGL operator called fattal02. It’s named after the lead author, Raanan Fattal, of the 2002 SIGGRAPH paper, Gradient Domain High Dynamic Range Compression. (The other authors are Dani Lischinski and Michael Werman ) I have not read this paper yet, but I have visited the site at that link and have looked at their Belgium House photos. Their resulting photo is very impressive.
I also found this page, Parameters for tone mapping operators, which describes a number of tone mapping algorithms – not the details of the their operation – but when they’re useful and the type and quality of their output. It also describes the parameters that control the operation of the algorithm and provides hints on ranges of values that might produce the most promising results.
Frank Dürr’s page, Comparison of Tone Mapping Algorithms, is a very nice introduction to why tone mapping is necessary and shows the results of some of the tone mapping operators. (Added 2012-08-22.)
I tried out fattal02 on this scene, which is, yet again, a slightly different crop of a photo that I’ve been using for a number of experiments. My first inclination was to use the same starting photo that I had been using for my c2g experiments, but I’m running GIMP 2.8 on Fedora 17 running in a virtual machine. It works, but is by no means very fast. Anyway, here’s the photo upon which I conducted my experiments:

Below is the result that I got by using Alpha=0.10, Beta=0.90, and Saturation=0.80. I tried other values for Alpha, Beta, and Saturation that were close to these values, but only saw subtle differences in the output – sometimes, the differences were so subtle that I couldn’t see a difference. I also tried a few values that were farther away, but the output was not as good, in my opinion.

I find it interesting that the color near an edge is either lighter or darker, depending on where it is, and then becomes either darker or lighter away from the edge. The sky, for example, is pretty dark, but it lightens up considerably around the buildings and trees giving them a halo. The walls of the building, on the other hand, are lighter in color, except near the edges where they generally darken.
I tried playing with this scene using the Curves tool after running fattal02, but I couldn’t do much with the whole scene. The point of tone mapping, in some instances anyway, is to decrease the dynamic range of the image so that details can be seen on displays which also have a limited dynamic range. This is definitely what happened here. This is the histogram shown by the Curves tool:

I also tried selecting the sky by color, but this proved very difficult to do, in the fattal layer anyway, due to the fact that the color of the sky ended up being somewhat close to other colors in the scene. However, it’s relatively easy to select by color in the original scene. When I do that and play with the curves for one of the fattal02 layers, I can lighten the sky up like so:

There are two other tone mapping operations provided by GEGL, mantuik06, and reinhard05, but my early attempts at using them produced no useful results. But, to be fair, I had not yet found the page which describes how the parameters should be set.
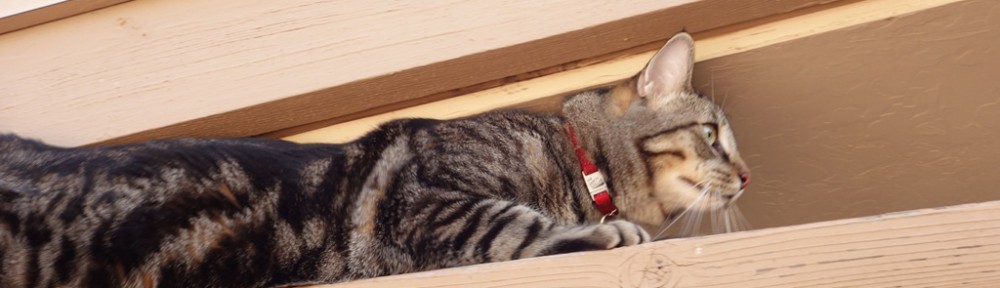
Tiger wanted to visit the balcony too, so I let him join Marilyn and Marie who were there reading. He eventually made his onto the roof, and began his prowl.

But the roof wasn’t interesting enough for Tiger. He wanted to get down to explore the yard too. He found a beam onto which he could jump. He pondered his next move:

His next move was to see if he could squeeze into a tight space…

…so that he could crawl along another beam:

Of course, it’s natural to want to rest for a while after crawling on your belly.

But it only required a short hop to the tarp-wrapped, folded-up ping pong table to get down.

Once he jumped down, I scooped him up and brought him inside. He’ll have to wait for another day to prowl the yard.
Now that the kittens are gone, we’ve been letting our cats out onto the balcony. They enjoy sitting on the cat gym that we built for the kittens. Sometimes, they watch birds as Callisto is doing here:

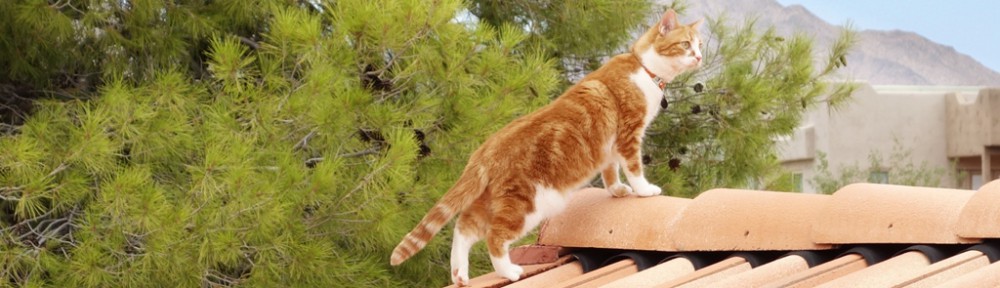
Earlier today, I let Freckles out on the balcony, where she too watched birds for a while:

But, then she got bored, and started to explore…

..venturing to the top of the roof:

Marie became worried about Freckles so she, too, ventured out onto the roof. She caught Freckles…

…and returned her…

…safely to the balcony.

I’ve done some more experimentation with the GEGL c2g operation in GIMP. I started out with a slightly expanded crop of the image shown in Making Garish Images with GIMP. I wanted to include more of the sky and some of the shadow on the driveway pavement in this one. (In earlier experiments, I was able to make the shadow look very textured, almost as if it were tar poured onto the driveway.)
I used an image sized at 3498×2778. I’ve scaled the images shown here to 1600×1271. (To view them at that resolution, you’ll probably have to right click on the image and show it in a different tab or window.)

I then ran the c2g operation on this image, using various parameters. These parameters are radius, samples, and iterations. These parameters are described in Black and White Conversion with GEGL’s c2g (color2gray) in GIMP. The defaults for these parameters, shown in the c2g dialog, are radius=300, samples=4, and iterations=10.
I had played around with c2g on other images and new that I would need a larger radius for this image. Here is what it looks like with radius=600, samples=10, and iterations=10. Note the ripples in the sky and the white halo (border) at the edges of the tree branches.

I found that I could change the ripples in the sky by using a larger radius. In the photo, below, I changed the radius to 1000, while leaving the number of samples and iterations both set to 10. Note that the ripples are still there, but that the sky is darker in the upper right hand corner. The ripples are perhaps less pronounced in this photo too.

I found that I could change the appearance of the sky by increasing the number of samples used per iteration. In this next photo, below, I again used a radius of 600, with 10 iterations, but set samples to 120. (Yes, that’s a big jump from 10.)

I don’t see those same ripples in the original color image. I decided to see what would happen if I bumped up all of the parameters. Here is what the image looks like with a radius of 1200, 180 samples per iteration, and 20 iterations. Note that the sky’s color has evened out a lot, but that it’s still very dark in a small portion of the upper right hand corner. It took perhaps twenty to thirty minutes for my machine to do the processing with these parameters – c2g is very compute intensive!

The above image is starting to look pretty good, but that dark corner still bugged me. I ran c2g one last time and let it run while I slept. This run is with radius=1500, samples=300, and iterations=20.

This is a pretty good grayscale rendition of the original color image. We could use it as is, but we can also use it to do other things.
This is what we get when we put the original image above it and set the layer mode to color. I kind of like this one.

If we’re going for the extreme HDR color effect, we can set up three layers, the original image at the bottom, the c2g layer in the middle, set for grain extract, and a duplicate of the original layer on top, set for grain merge. Here is the result with the opacity for each layer set to 100%:

The effect can be easily muted, however, by simply changing the opacity of the c2g layer. Here, the opacity has been set to 50%:
