Tag: GIMP (page 1 of 1)

Fountain After Sunset

I wasn’t very happy with the Fattal tone mapping on my HDR Fountain photo.  I experimented with different tone mapping algorithms and parameters to those operations and eventually settled on Durand.  According to Parameters for tone mapping operators, Durand “produces the most realistic pictures. No extreme effects, but very nice output with lots of details in the picture.”  I used the following parameters with Durand:

  • Base Contrast: 4.4
  • Spatial Kernel Sigma: 7.0
  • Range Kernel Sigma: 5.1
  • Result Size: 6000×4000
  • Pre-gamma: 0.52

I didn’t change any of the levels or gamma in Luminance HDR.  Instead, I used GIMP and treated the HDR result as if it were an image that came out of my camera.  I employed the usual techniques of making layers, creating layer masks, and setting the layer modes to achieve the effects that I’m after for certain portions of the image.

Here’s the result:

Tone Mapping in GIMP using the GEGL Operator fattal02

GIMP 2.8.0 includes a new – well, new to me anyway – GEGL operator called fattal02.  It’s named after the lead author, Raanan Fattal, of the 2002 SIGGRAPH paper,  Gradient Domain High Dynamic Range Compression.  (The other authors are Dani Lischinski and Michael Werman ) I have not read this paper yet, but I have visited the site at that link and have looked at their Belgium House photos.  Their resulting photo is very impressive.

I also found this page, Parameters for tone mapping operators, which describes a number of tone mapping algorithms – not the details of the their operation – but when they’re useful and the type and quality of their output.  It also describes the parameters that control the operation of the algorithm and provides hints on ranges of values that might produce the most promising results.

Frank Dürr’s page, Comparison of Tone Mapping Algorithms, is a very nice introduction to why tone mapping is necessary and shows the results of some of the tone mapping operators.  (Added 2012-08-22.)

I tried out fattal02 on this scene, which is, yet again, a slightly different crop of a photo that I’ve been using for a number of experiments.  My first inclination was to use the same starting photo that I had been using for my c2g experiments, but I’m running GIMP 2.8 on Fedora 17 running in a virtual machine.  It works, but is by no means very fast.  Anyway, here’s the photo upon which I conducted my experiments:

Below is the result that I got by using Alpha=0.10, Beta=0.90, and Saturation=0.80.  I tried other values for Alpha, Beta, and Saturation that were close to these values, but only saw subtle differences in the output – sometimes, the differences were so subtle that I couldn’t see a difference.  I also tried a few values that were farther away, but the output was not as good, in my opinion.

I find it interesting that the color near an edge is either lighter or darker, depending on where it is, and then becomes either darker or lighter away from the edge.  The sky, for example, is pretty dark, but it lightens up considerably around the buildings and trees giving them a halo.  The walls of the building, on the other hand, are lighter in color, except near the edges where they generally darken.

I tried playing with this scene using the Curves tool after running fattal02, but I couldn’t do much with the whole scene.  The point of tone mapping, in some instances anyway, is to decrease the dynamic range of the image so that details can be seen on displays which also have a limited dynamic range.  This is definitely what happened here.  This is the histogram shown by the Curves tool:

I also tried selecting the sky by color, but this proved very difficult to do, in the fattal layer anyway, due to the fact that the color of the sky ended up being somewhat close to other colors in the scene.  However, it’s relatively easy to select by color in the original scene.  When I do that and play with the curves for one of the fattal02 layers, I can lighten the sky up like so:

There are two other tone mapping operations provided by GEGL, mantuik06, and reinhard05, but my early attempts at using them produced no useful results.  But, to be fair, I had not yet found the page which describes how the parameters should be set.

More c2g experiments

I’ve done some more experimentation with the GEGL c2g operation in GIMP.  I started out with a slightly expanded crop of the image shown in Making Garish Images with GIMP.  I wanted to include more of the sky and some of the shadow on the driveway pavement in this one.  (In earlier experiments, I was able to make the shadow look very textured, almost as if it were tar poured onto the driveway.)

I used an image sized at 3498×2778.  I’ve scaled the images shown here to 1600×1271.  (To view them at that resolution, you’ll probably have to right click on the image and show it in a different tab or window.)

I then ran the c2g operation on this image, using various parameters.  These parameters are radius, samples, and iterations. These parameters are described in Black and White Conversion with GEGL’s c2g (color2gray) in GIMP.  The defaults for these parameters, shown in the c2g dialog, are radius=300, samples=4, and iterations=10.

I had played around with c2g on other images and new that I would need a larger radius for this image.  Here is what it looks like with radius=600, samples=10, and iterations=10.  Note the ripples in the sky and the white halo (border) at the edges of the tree branches.

I found that I could change the ripples in the sky by using a larger radius.  In the photo, below, I changed the radius to 1000, while leaving the number of samples and iterations both set to 10.  Note that the ripples are still there, but that the sky is darker in the upper right hand corner.  The ripples are perhaps less pronounced in this photo too.

I found that I could change the appearance of the sky by increasing the number of samples used per iteration.  In this next photo, below, I again used a radius of 600, with 10 iterations, but set samples to 120.  (Yes, that’s a big jump from 10.)

I don’t see those same ripples in the original color image.  I decided to see what would happen if I bumped up all of the parameters.  Here is what the image looks like with a radius of 1200, 180 samples per iteration, and 20 iterations.  Note that the sky’s color has evened out a lot, but that it’s still very dark in a small portion of the upper right hand corner.  It took perhaps twenty to thirty minutes for my machine to do the processing with these parameters – c2g is very compute intensive!

The above image is starting to look pretty good, but that dark corner still bugged me.  I ran c2g one last time and let it run while I slept.  This run is with radius=1500, samples=300, and iterations=20.

This is a pretty good grayscale rendition of the original color image.  We could use it as is, but we can also use it to do other things.

This is what we get when we put the original image above it and set the layer mode to color.  I kind of like this one.

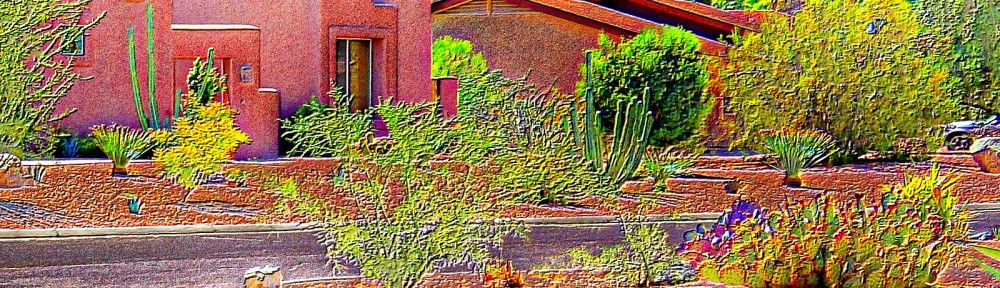
If we’re going for the extreme HDR color effect, we can set up three layers, the original image at the bottom, the c2g layer in the middle, set for grain extract, and a duplicate of the original layer on top, set for grain merge.  Here is the result with the opacity for each layer set to 100%:

The effect can be easily muted, however, by simply changing the opacity of the c2g layer.  Here, the opacity has been set to 50%:

Making Garish Images with GIMP

This isn’t a tutorial so much as it notes for myself regarding some of my recent experimentation in GIMP.  The resulting images are garish, but I find them oddly compelling.

Here is a crop of a photo that I took from my driveway.  The original photo was 6000×4000 pixels.  I performed the various operations described below on the full size image.  Only later, after I saw what the image looked like after doing various manipulations, did I crop it to 1600×1080.  It is a kind of blah photo.  Aside from the crop, I performed no other manipulations on this image.  I should note, however, that it was one of the HDR images produced by my NEX-7.

Next, I performed one round of Gaussian Blur, Grain Extract, and Grain Merge on the photo.  I used a blur radius of 50 because I noticed that I was getting a large halo around trees and along the skyline when I used large values.  I still need to do more experimentation to find an optimal value.  Alternately, it may be possible to mask the problem areas to avoid this issue.  Here is the result:

In Easy Overprocessing with c2g, I found about GIMP’s c2g filter.  I’ve tried the techniques described on that page, but haven’t yet gotten similar results.  It may be that I’m missing a step.  Another interesting article about c2g is How to Make Stylish Black & White Digital Photos with the GIMP.  I’ve skimmed it and it’s worthy of further study.  Another good article is Black and White Conversion with GEGL’s c2g (color2gray) in GIMP.  It provides some very, very helpful hints on how to best set some of c2g’s parameters.

The c2g operation converts a color image to grayscale, but the resulting grayscale image can be much more striking than just using Colors->Desaturate… In GIMP 2.6.11, the c2g operation is found under Tools->GEGL Operation…  From there, a dialog will pop up, at which point,you need to select c2g from the menu. Here is what the crop looks like after subjecting the entire 6000×4000 image to c2g with Radius=500, Samples=10, and Iterations=10.

Here is what a desaturated image looks like using Colors->Desaturate…  I ended up using a portion of this image for the sky.

The c2g version appears to have more texture to it.  The sky, however, turned out to have too much texture for my taste, so I created the second version to use for the sky alone.  I applied a layer mask containing only the sky to that layer and an inverted mask to the c2g layer.  With the masks applied, I set the layer mode to Grain Extract for both of these layers.  Here’s what that ends up looking like:

Note that the sky has a fairly smooth texture to it, but the buildings and even the street appear to have a significant amount of texture.

Next, I duplicated the blur-extract-merge layer that I started with, put it on top of the layer stack, and set its mode to Grain Merge.  Here’s the result with those four layers visible:

This might actually be a good place to stop, but I decided to see what it looks like by duplicating the two grain extract layers and the top-most grain merge layer and then placing those layers in the correct order on the top of the layer stack.  Here’s the result:

Performing another round of duplicating the grain extract and grain merge layers and placing them at the top of the stack produces this image:

I wanted the sky to be a deeper blue, so I added a grain extract layer of the desaturated sky with the opacity set to 71%.   Here’s the GIMP layer window for the upcoming image:

Below is the final image.  It may be that one of the earlier images is “better”, or maybe they’re all just awful.  I’m too close to it right now and probably need to look at the whole thing again in a few days.  It is interesting though to see the variety of contrasting colors obtained using this technique.  At no stage in the process, except for the last step where I fiddled with the sky color, did I actually choose any of those colors.  They just came out on their own by iterating grain extract / merge operations on the grayscale image produced by c2g.

GIMP Tutorial: Using Blur, Grain Extract, and Grain Merge for Vivid Pictures

I took the photo below while hiking at McDowell Mountain Park recently.  Kind of boring, right?

Actually, that’s not quite how it looked out-of-camera.  I cropped it to show half of the flowering plant.   I thought that showing half of the plant with the rock to the left looked more interesting.

If you duplicate the layer – it’ll be named Background in GIMP – and then do a Gaussian Blur with a 150 pixel radius, it’ll look like this:

The blur radius you use will depend upon the size of the image that you’re working on.  I was working on a 3510×3593 pixel image, so a fairly big blur radius seemed like a good idea.  If you’re working on a smaller image, you’ll want to adjust it accordingly.  Don’t be afraid to experiment.  (Since first posting this, I learned that using a large blur radius often creates large halos.  It’s probably best to try a smaller blur radius first, of perhaps only five pixels or so.)

Next, set the layer mode of the blurred layer to Grain Extract.  I don’t claim to understand what it’s doing, but here’s what it will look like when you enable the visibility on the Background and the blur+extract layer – that’s what I named that layer.  If you don’t name the layer, GIMP will just add “copy” and then “copy 2”, etc. after the layer name.  There’s nothing wrong with this for experimentation, but once you have three or more layers, it starts to get confusing which is which.

Now, duplicate the Background layer yet again and put it at the top of the layers list.  Change the layer mode from Normal to Grain Merge.  Here’s the result – I named this new layer the same as the layer mode, just to keep track of it more easily:

If you duplicate the blur+extract layer again and move it to the top of the layer list and then duplicate the grain merge layer again and move it to the top of the layer list and then add a slight S-curve using the Curves tool, the image looks like this:

You could repeat that last step several more times if desired, but I decided that this result was vivid enough and decided to stop.  If it ended up being too vivid, but the previous result wasn’t quite vivid enough, you can move the opacity slider in the top-most layer which, for me was named grain merge 2.  Moving the slider to the left, thus decreasing the opacity of that layer, will allow you to fine tune the result.