Category: Photos (page 26 of 28)

Photographs

GIMP Tutorial: Using Blur, Grain Extract, and Grain Merge for Vivid Pictures

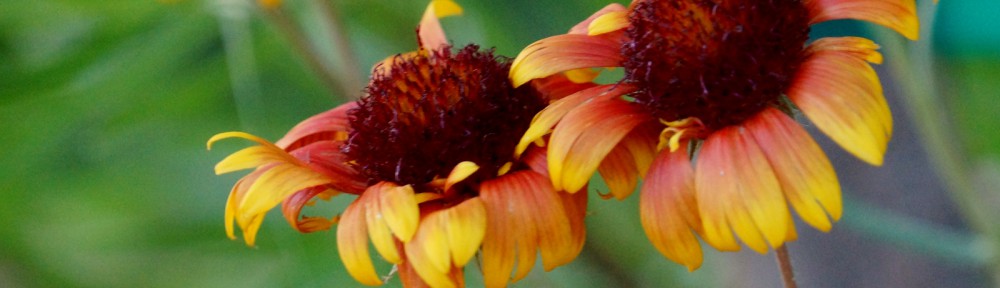
I took the photo below while hiking at McDowell Mountain Park recently.  Kind of boring, right?

Actually, that’s not quite how it looked out-of-camera.  I cropped it to show half of the flowering plant.   I thought that showing half of the plant with the rock to the left looked more interesting.

If you duplicate the layer – it’ll be named Background in GIMP – and then do a Gaussian Blur with a 150 pixel radius, it’ll look like this:

The blur radius you use will depend upon the size of the image that you’re working on.  I was working on a 3510×3593 pixel image, so a fairly big blur radius seemed like a good idea.  If you’re working on a smaller image, you’ll want to adjust it accordingly.  Don’t be afraid to experiment.  (Since first posting this, I learned that using a large blur radius often creates large halos.  It’s probably best to try a smaller blur radius first, of perhaps only five pixels or so.)

Next, set the layer mode of the blurred layer to Grain Extract.  I don’t claim to understand what it’s doing, but here’s what it will look like when you enable the visibility on the Background and the blur+extract layer – that’s what I named that layer.  If you don’t name the layer, GIMP will just add “copy” and then “copy 2”, etc. after the layer name.  There’s nothing wrong with this for experimentation, but once you have three or more layers, it starts to get confusing which is which.

Now, duplicate the Background layer yet again and put it at the top of the layers list.  Change the layer mode from Normal to Grain Merge.  Here’s the result – I named this new layer the same as the layer mode, just to keep track of it more easily:

If you duplicate the blur+extract layer again and move it to the top of the layer list and then duplicate the grain merge layer again and move it to the top of the layer list and then add a slight S-curve using the Curves tool, the image looks like this:

You could repeat that last step several more times if desired, but I decided that this result was vivid enough and decided to stop.  If it ended up being too vivid, but the previous result wasn’t quite vivid enough, you can move the opacity slider in the top-most layer which, for me was named grain merge 2.  Moving the slider to the left, thus decreasing the opacity of that layer, will allow you to fine tune the result.

Approaching Sunrise, at McDowell Mountain Park

This photo was taken several minutes before sunrise at McDowell Mountain Park.  Once the sun actually rose, the orange glow in the clouds pretty much disappeared.

Friday Fitness Hike

Today’s fitness hike started at the Trailhead Staging Area.  We hiked about a mile of the Pemberton to the Scenic.  We then hiked the ridgeline of the Scenic Trail and descended the big rocky hill towards the wash.  Just before entering the wash, we turned left onto the new trail which took us to the Horse Staging Area.  From there we crossed the main park road and hiked the service road, crossing the Sport Loop twice.  That dumped us into Stoneman Wash where we hiked back to Pemberton.  From there, we hiked nearly a mile back to the parking area.  Total distance was 7.1 miles.

There were five of us today: Janet, Bob, Linda, Marilyn, and me.

A view from the Scenic Trail:

Another view from the Scenic Trail.  Red Mountain is visible in both of these shots.

Courthouse Towers, Arches National Park

Park Avenue, Arches National Park

Sheep Rock

Sunrise

After the Storm in McDowell Mountain Park

A monsoon storm came through the area yesterday afternoon.  Just before sunset, Marilyn and I drove to McDowell Mountain Park and walked to the top of the Hilltop Trail to get some photos.

A buckhorn cholla silhouette:

Low clouds (or smoke?) lying low on one of the lower mountains; shiny wet rocks:

Fantastical clouds:

More clouds:

Red Mountain off in the distance:

A saguaro silhouette:


Moab Rim Trail

On Wednesday during our week’s stay in the Moab area during June of 2012, we hiked the Moab Rim Trail.  Known locally as “Moab’s Stairmaster”, it climbs over eight hundred feet within the first mile.  The trail description at the bottom exaggerates a bit, claiming an elevation gain of one thousand feet in a mile.  It is popular with some of the locals though because it’s close to town and provides a heck of a workout just hiking up to the rim and back, about two miles total.

The Moab Rim Trail is actually a jeep trail and a very difficult one at that.   Here is how the sign at the bottom describes it:

The Moab Rim Route follow the Kayenta sandstone ledge from here to the rim above the town of Moab.  The route is used by hikers, bikers, motorcyclists, and jeepers.  It gains 1,000 feet in elevation in about a mile.  The ledges make it particularly challenging to motorized vehicles.  The Moab Rim Route is rated as a “4+” route by the Moab Red Rock Four-Wheelers Jeep Club – its most difficult rating.  (4+ trails are not suitable for stock vehicles, and over 10% of modified vehicles can expect “major mechanical difficulties”.)

Hopefully, this shot will help to convey a sense of how steep the first section is.  Even though it’s steep, the footing is excellent.

Marie took this photo of her Mom along the way:

Marie took this photo of herself standing on the rim.  The town of Moab is in the background.

When I got up to the rim, I saw a plant standing alone with these yellow flowers:

Marilyn and Marie amidst the sandstone:

Marilyn took this photo of Marie hiking along side large potholes in the sandstone.

Marie took this photo of the trail wending its way into a valley.

Marie, admiring the view just shortly before she and her Mom turned around:

I continued on and saw, from afar, this pass through the wall of rock.  I don’t know if there is a trail which goes through that pass or not.  I’d like to hike closer sometime to find out.

Another view from a bit further on down the trail.  At this point, I was perhaps halfway around the loop that would bring back to the girls.

Another shot from the same location:

A shot looking back in the direction from where I had come.  I didn’t hike either of those roads visible off in the distance though.  But I would like to walk them sometime though.

I eventually met up again with Marilyn and Marie and we hiked back to the rim together.  Here’s Marilyn somewhere near the rim:

A view of Arches National Park from the Moab Rim.  The arch visible in this photo is the South Window, I think.

Marilyn took this photo of Moab, below, and the La Sals in the distance.

A view of the Colorado River while descending the Moab Rim Trail:

Aarchway Inn Murals

The Aarchway Inn has two nice murals too, but they’re quite a lot more tranquil than a scene of a giant spider chasing a pack of mountain bikers.

With the right optics, you can sort of see these murals all the way from the Moab Rim.  This shot, below, was taken with my NEX-7 with the lens all the way out at 200mm.  I had to crop it a lot too to get a photo of the motel.  That busy highway in this photo is US 191.  The area behind the hotel is pretty nice though.  There’s an exercise area, a cabana with grill, and some flowerbeds.  If you look closely, you can see two murals on the back walls of the north and south wings of the motel.

Here’s the mural on the northernmost wall:

This is the mural on the wall to the south:

A few of the flowers not far from these murals: